ComfyUI
AIGC ComfyUI
简介
ComfyUI 是一个开源的、基于节点的用户界面工具,专为控制和自定义扩散模型(如 Stable Diffusion)而设计。它的主要特点和优势包括:
- 节点化操作:ComfyUI 采用直观的节点编辑方式,用户可以将各种处理功能(如图像输入、预处理、模型推理、后处理等)以节点形式组合成工作流。这种方式降低了对编程知识的要求,使得用户能够轻松构建和调整复杂的生成流程。
- 高度灵活与可扩展:由于其模块化的设计,用户可以根据需求添加、修改或替换节点,快速试验不同的参数设置和工作流组合,从而达到理想的生成效果。此外,开发者还可以扩展节点库,集成自定义功能。
- 实时预览与调试:ComfyUI 提供实时预览功能,用户可以在调整参数和节点配置时,及时看到生成结果的变化,有助于快速定位问题并优化生成流程。
- 适用于艺术创作和实验:无论是用于艺术创作、实验性研究还是自定义应用开发,ComfyUI 都能为用户提供一个友好且强大的图形化界面,降低使用门槛并提升效率。
总体来说,ComfyUI 为使用扩散模型的用户提供了一种无需编写代码就能直观构建生成流程的方式,使得图像生成、风格迁移等任务变得更加灵活和高效。
搭建
方式一、Google colab 平台搭建
Colab 简介
Google Colab(全称 Google Colaboratory)是 Google 提供的一个基于 Jupyter Notebook 的云端开发平台。 平台简介
- 在线编程环境:Colab 允许用户在浏览器中编写、执行和共享 Python 代码,不需要在本地配置环境。它内置了大部分数据科学和机器学习常用库,例如 TensorFlow、PyTorch、pandas、NumPy 等。
- 免费资源:用户可以免费使用 Colab 提供的 CPU、GPU(例如 Tesla K80、T4 等)以及 TPU 资源,非常适合用于深度学习、数据分析和科学计算等任务。对于资源需求较高的用户,Colab 也提供了付费版(Colab Pro 和 Pro+),可以获得更长的运行时间和更高性能的硬件资源。
- 云存储和协作:Colab 与 Google Drive 紧密集成,允许你直接在云端保存和加载数据与笔记本,方便与他人共享和协同工作。此外,所有项目都保存在云端,你可以随时从任何设备上访问和编辑。
搭建步骤
- 访问与登录
打开浏览器,访问 Google Colab。你需要使用 (https://colab.research.google.com/) Google 帐号登录才能创建和保存笔记本。
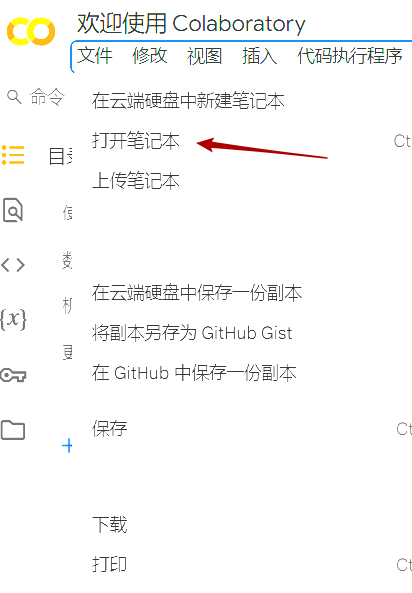
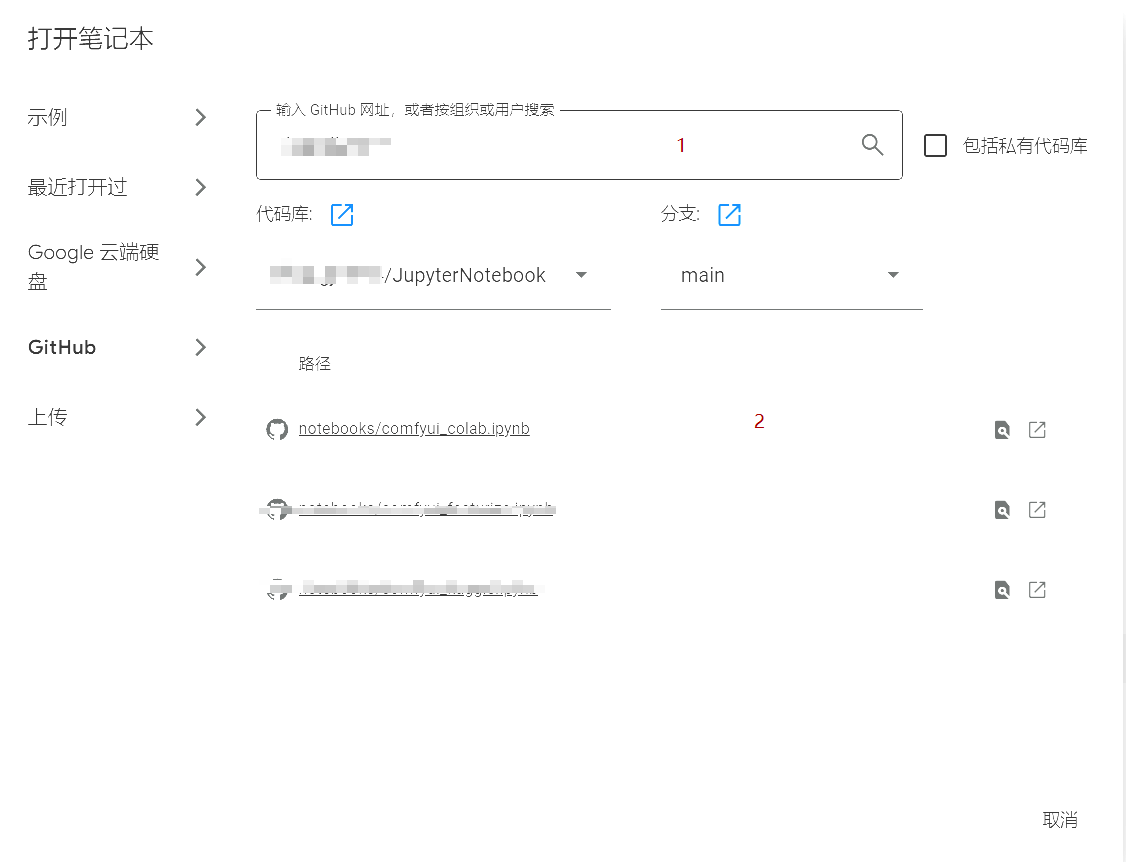
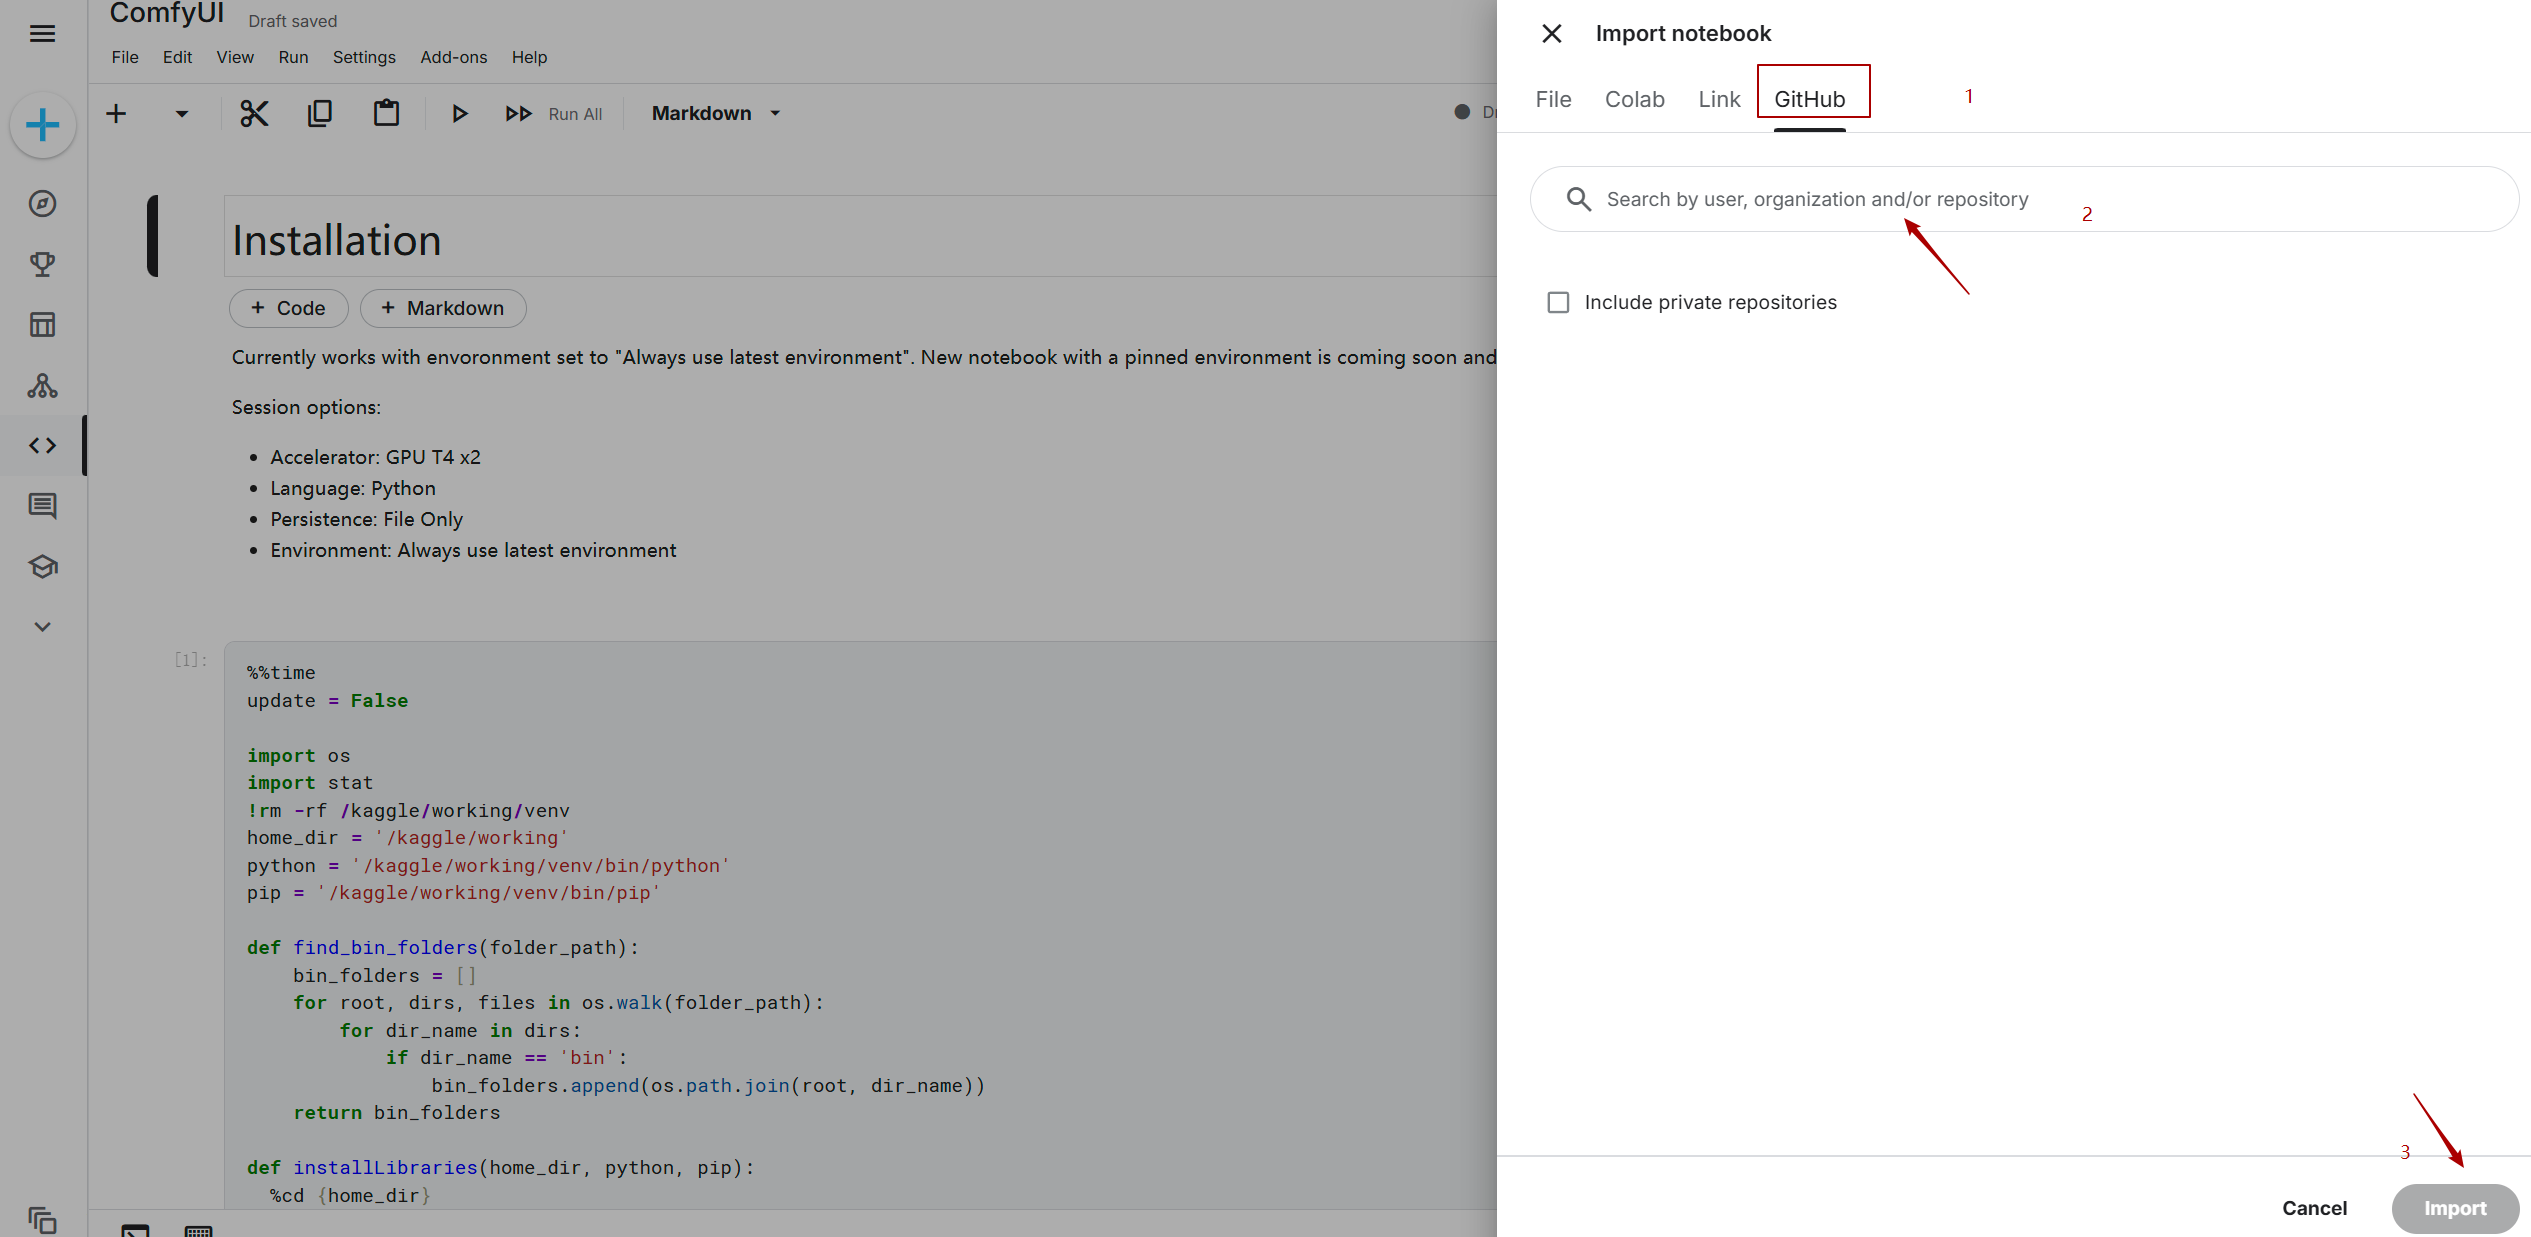
- 新建笔记本
登录后,在主页面点击“打开笔记本”,然后选择从github打开,输入ipynb文件路径搜索,然后点击相应的链接。这将为你创建一个 Jupyter Notebook 环境。
- 编辑和运行代码
在笔记本中,你可以添加代码单元和文本单元。输入代码后,点击单元左侧的运行按钮或使用快捷键(Shift+Enter)来执行代码。 ipynb文件可以参照此文件comfyui_colab.ipynb,大致流程:
- 从github 安装comfyui,并安装依赖。
- 下载需要的模型。
- 启动comfyui,通过cloudflared内网穿透,给出访问链接。
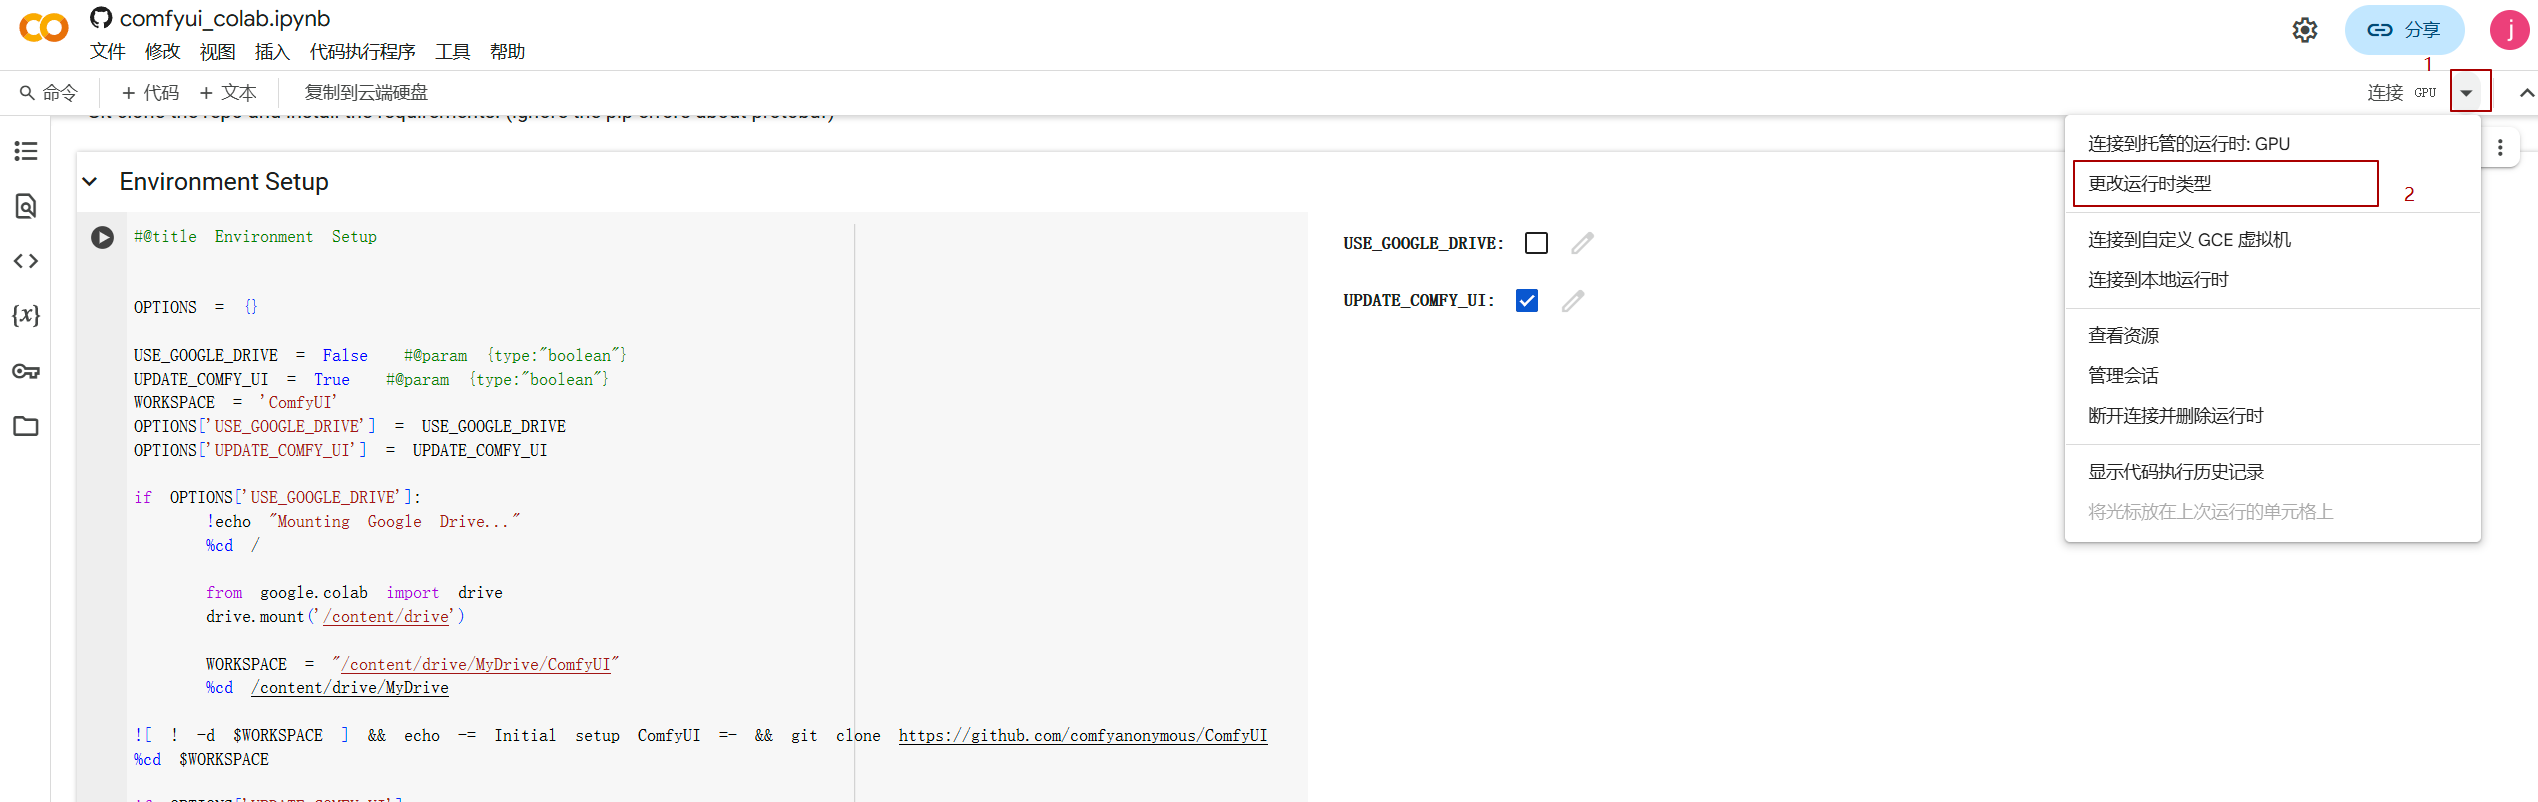
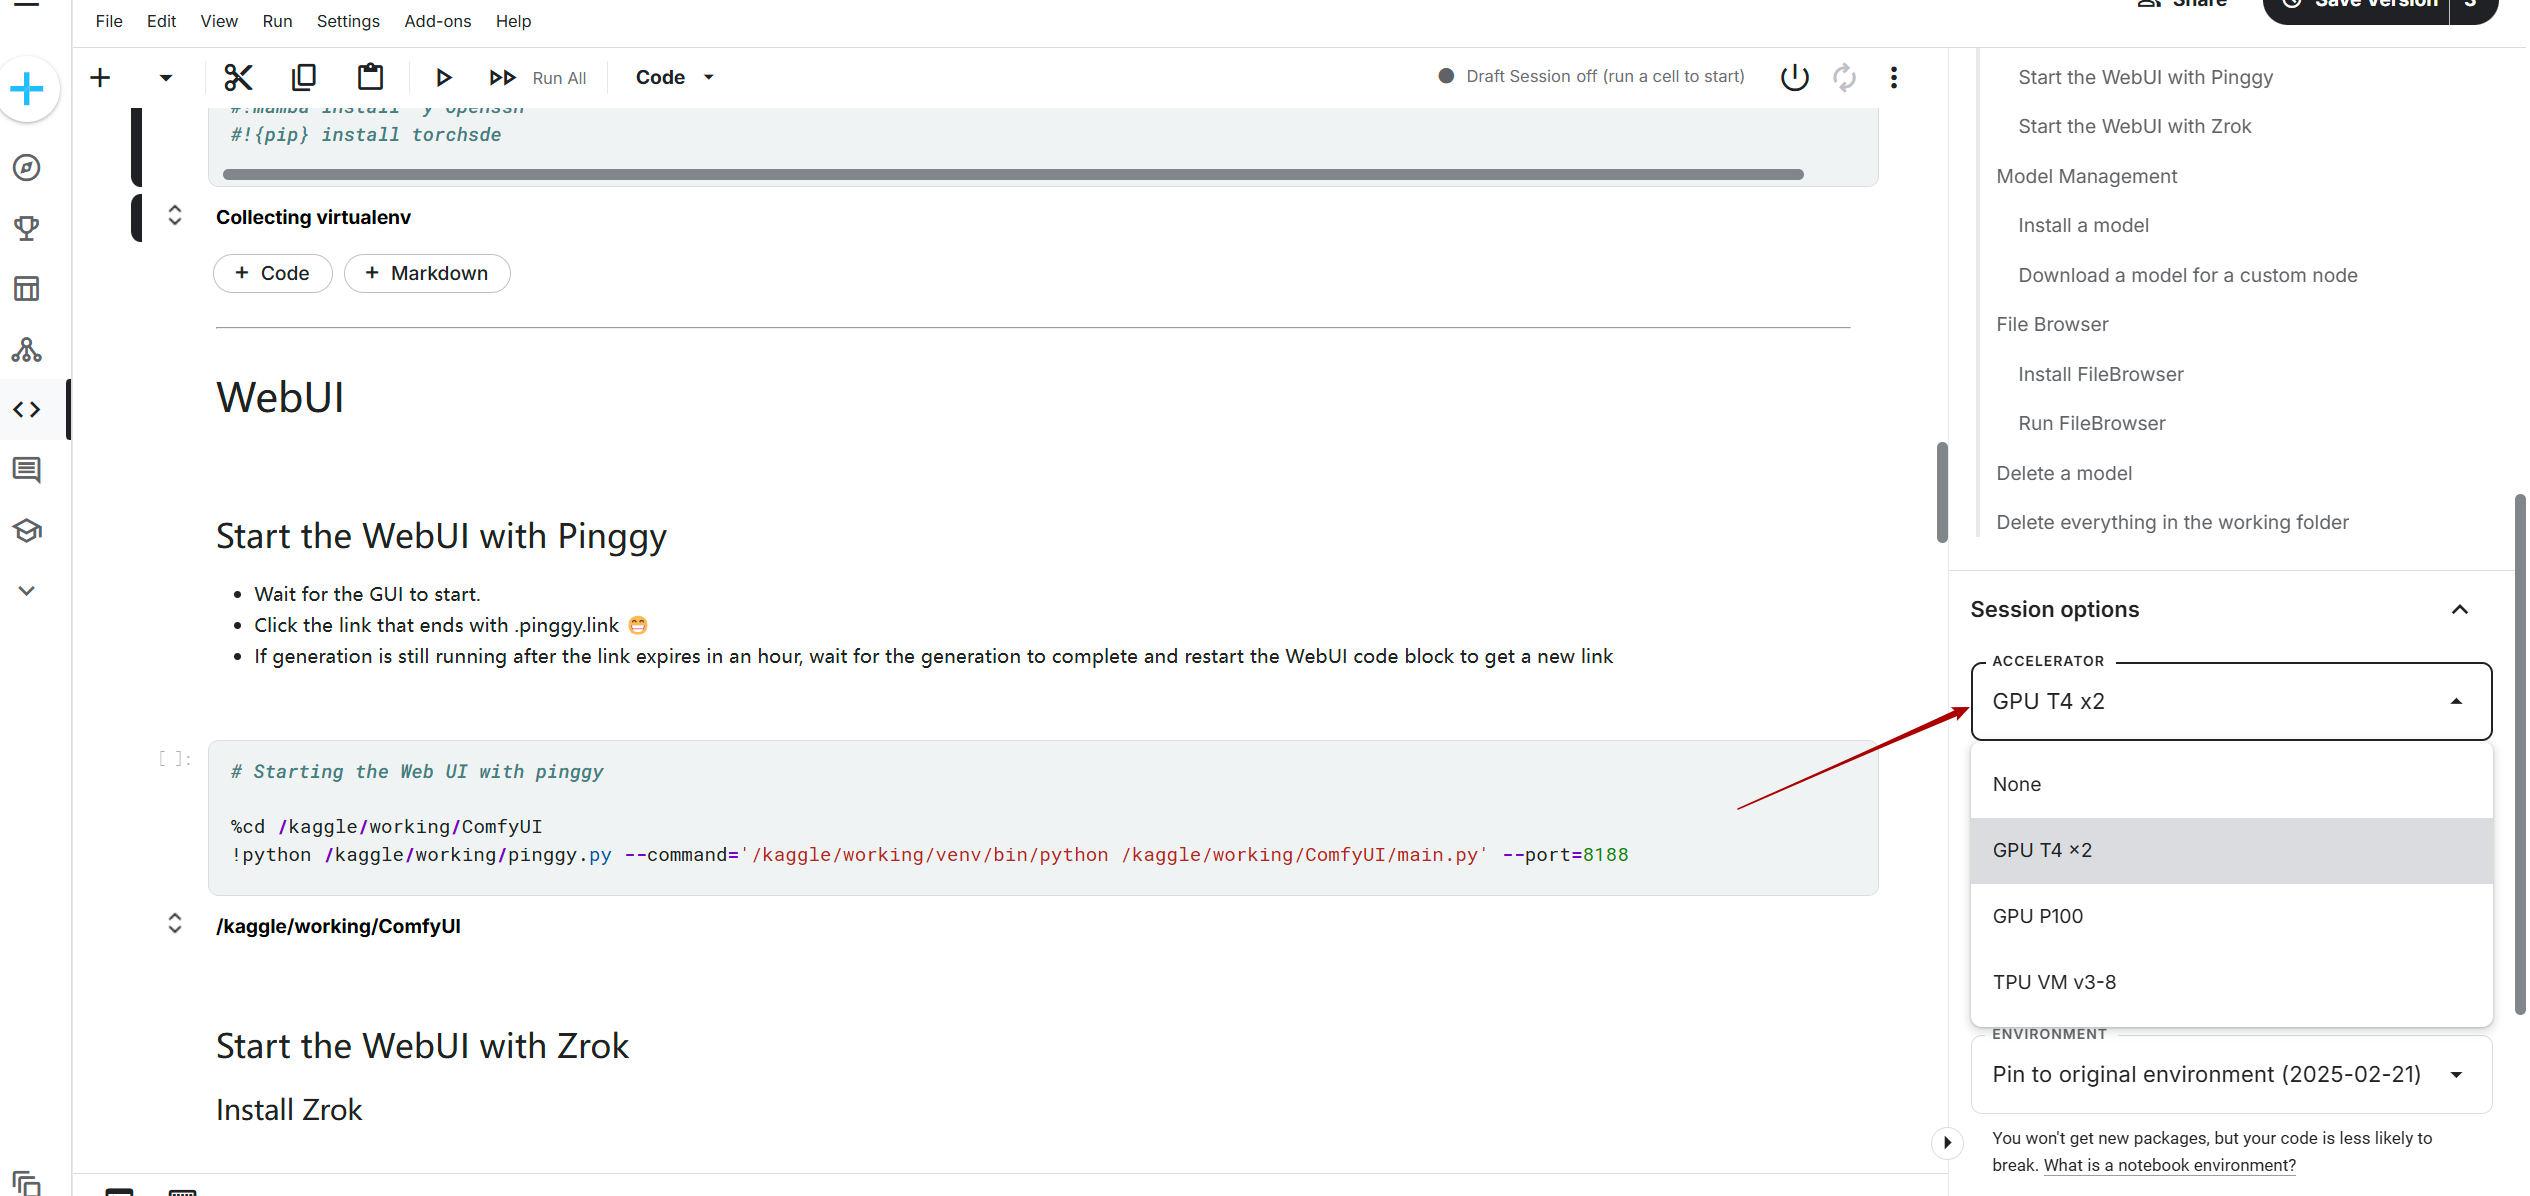
- 切换硬件加速器
需要使用 GPU 进行加速,请依次点击菜单栏中的:
- “运行时” → “更改运行时类型”
- 在“硬件加速器”选项中选择 GPU
这样,笔记本将获得对应的硬件资源支持。

方式二、Kaggle 平台搭建
Kaggle简介
Kaggle 是一个专为数据科学和机器学习爱好者设计的平台,主要提供以下功能:
- 数据竞赛:Kaggle 定期举办各类数据竞赛,企业和组织会在平台上发布实际问题,参赛者通过开发模型来解决问题并竞争奖金。这为数据科学家提供了展示技能、解决实际问题和学习最新技术的机会。
- 公共数据集:平台上有大量由用户和机构分享的公共数据集,涵盖金融、医疗、零售、社交等多个领域。你可以免费浏览、下载和使用这些数据集进行实验和项目开发。
- Kaggle Kernels(Notebooks):Kaggle 提供基于 Jupyter Notebook 的在线编程环境,无需在本地搭建环境就可以进行数据分析和建模。你可以直接在浏览器中运行 Python 或 R 代码,分享和复现他人的分析流程。
- 社区与讨论:Kaggle 拥有活跃的社区,用户可以在论坛和讨论区交流经验、分享学习资源、解答问题,是学习和提升技能的好地方。
搭建步骤
- 访问与登录
打开浏览器,访问 Kaggle
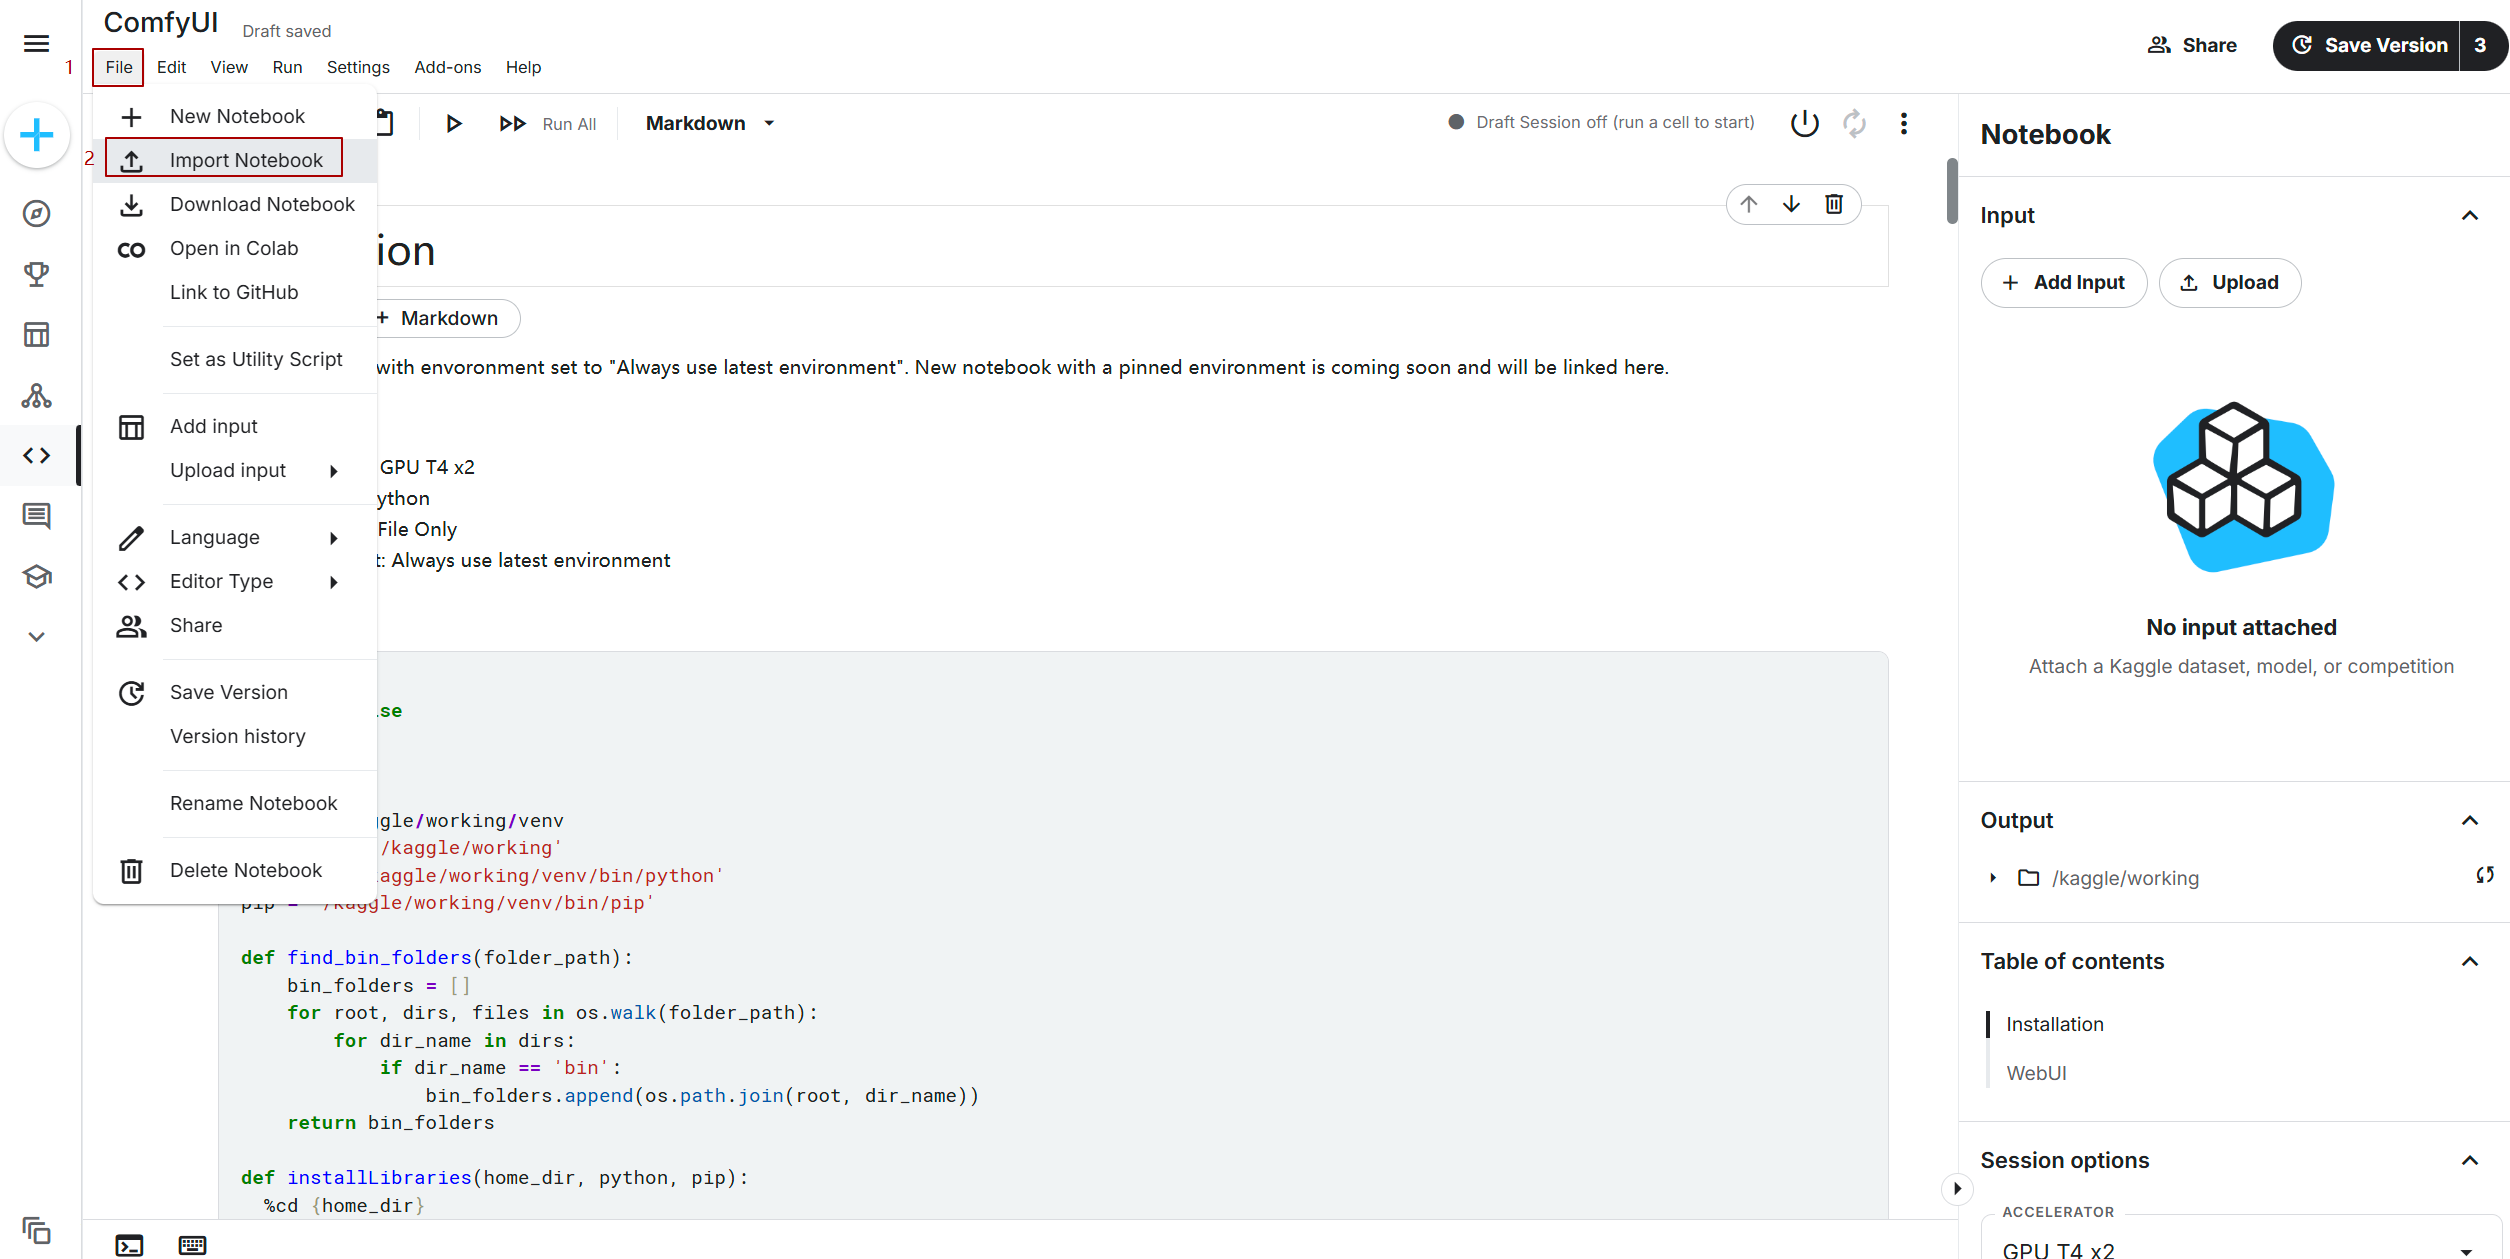
- 新建笔记本
点击”File -> Import Notebook”,选择github,输入comfyui_kaggle.ipynb地址,点击导入即可新建一个笔记本。 该笔记本大致流程:
- 安装comfyui,并安装依赖,安装Node Manager及其依赖。
- 启动comfyui,通过pinggy内网穿透,给出访问链接。
- 更改加速器
方式三、Featurize平台搭建
Featurize 简介
featurize 是一个专注于机器学习和深度学习的在线开发平台,提供高性能 GPU 资源、预配置的开发环境及灵活的计算服务。其核心目标是简化 AI 模型的训练与部署流程,用户无需自行搭建硬件环境或管理复杂依赖,即可快速启动实验和项目开发。
核心功能与优势:
-
按需 GPU 资源
- 提供NVIDIA GPU,按量计费低至 ¥0.69/小时,支持分钟级计费与实例释放。
- 配备高性能 CPU(AMD EPYC/Xeon Gold)与大内存(60GB+),满足复杂模型训练需求。
-
开箱即用的开发环境
- 预装主流框架(PyTorch、TensorFlow、飞桨等)及 CUDA 工具链,支持多版本切换,减少环境配置时间。
- 集成 Jupyter Notebook 和 SSH 远程开发,支持 PyCharm 等 IDE 直连。
-
便捷的数据管理
- 提供免费大容量存储(最高 750GB),支持快速上传数据集(图形化界面或 FileZilla 工具)。
- 内置常用公开数据集(如 Kaggle 竞赛数据),简化数据预处理流程。
-
灵活的应用场景
- 支持目标检测(YOLOv7)、图像分类(ResNet)、自然语言处理等多种任务,覆盖学术研究、工业级模型训练及竞赛需求。
- 适用于高校实验室、初创团队及个人开发者,提供高性价比的算力解决方案。
搭建步骤
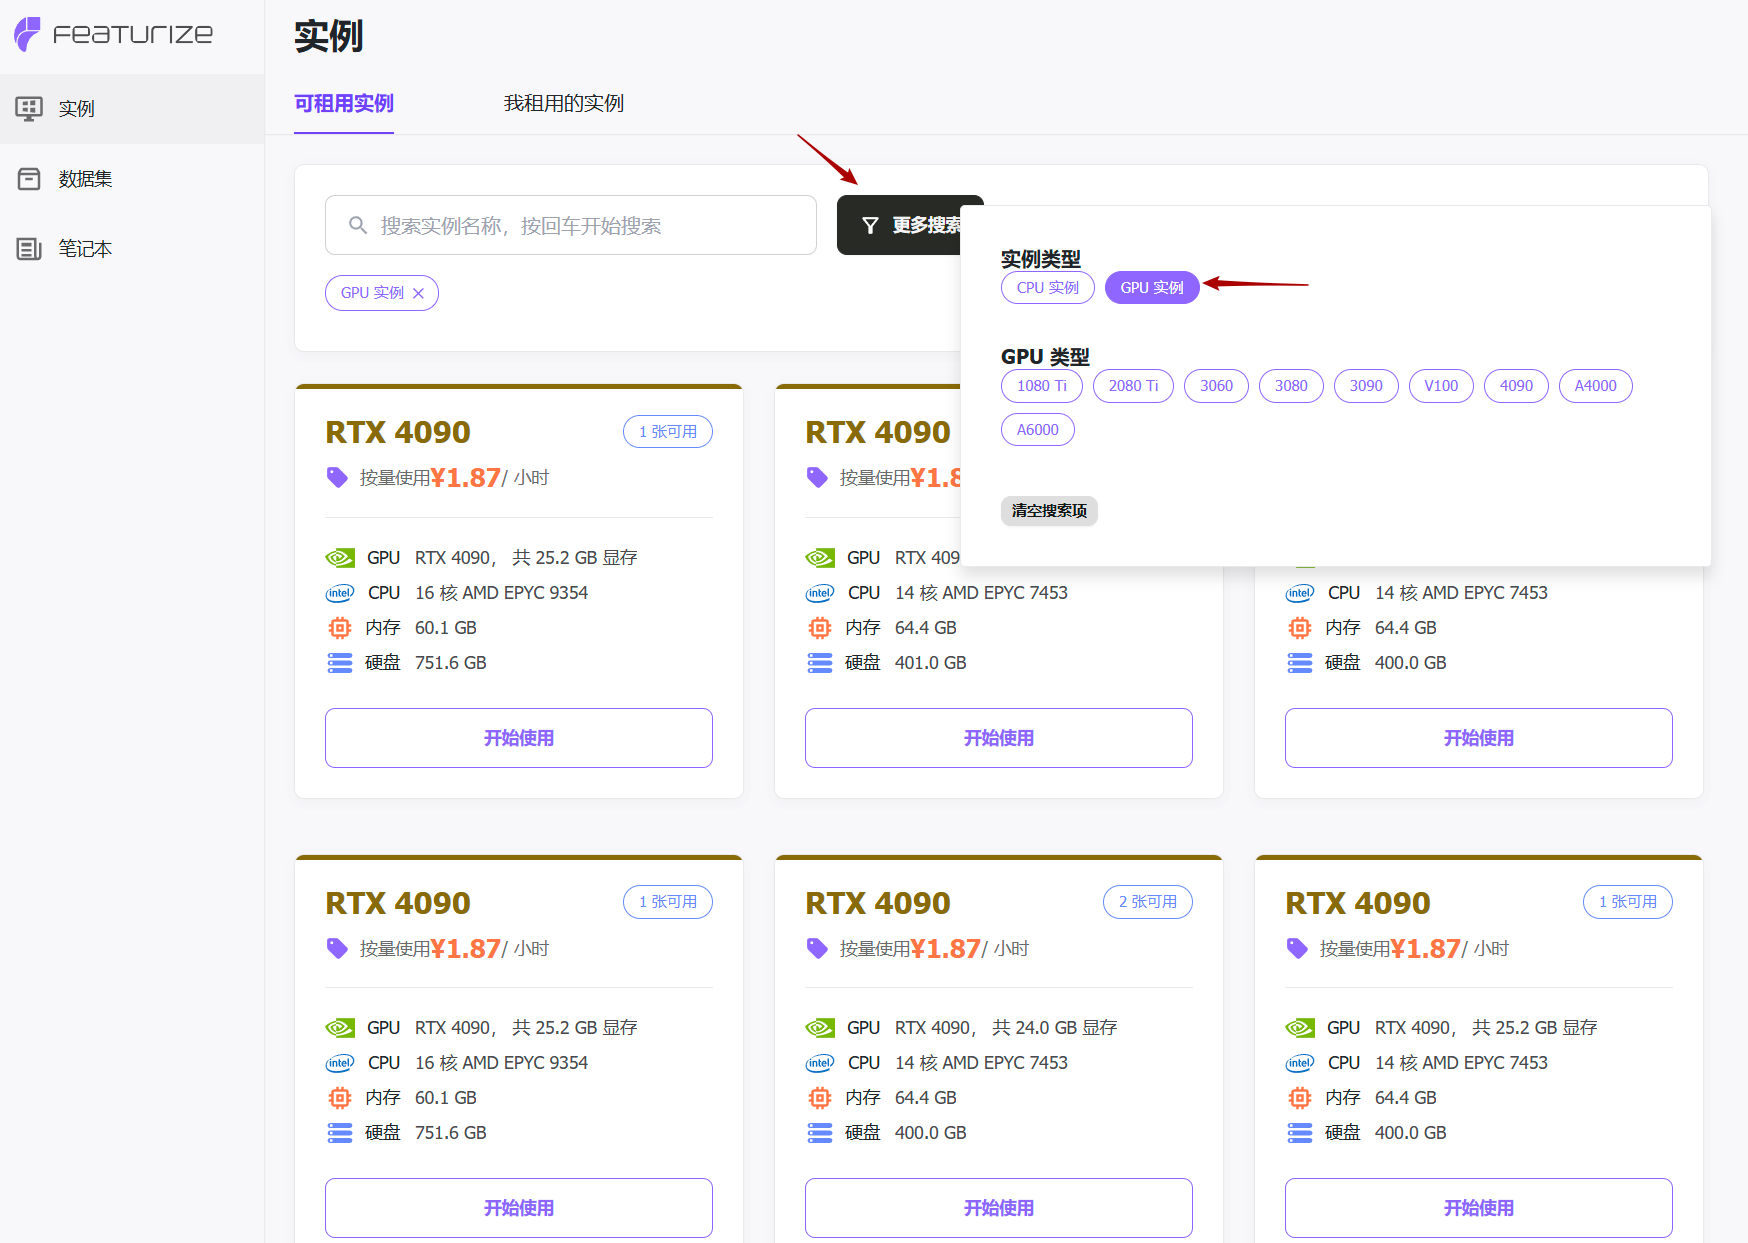
- 租用服务器
访问featurize网站并注册登录,筛选实例类型为GPU,选择想要租用的服务器并点击开始使用。
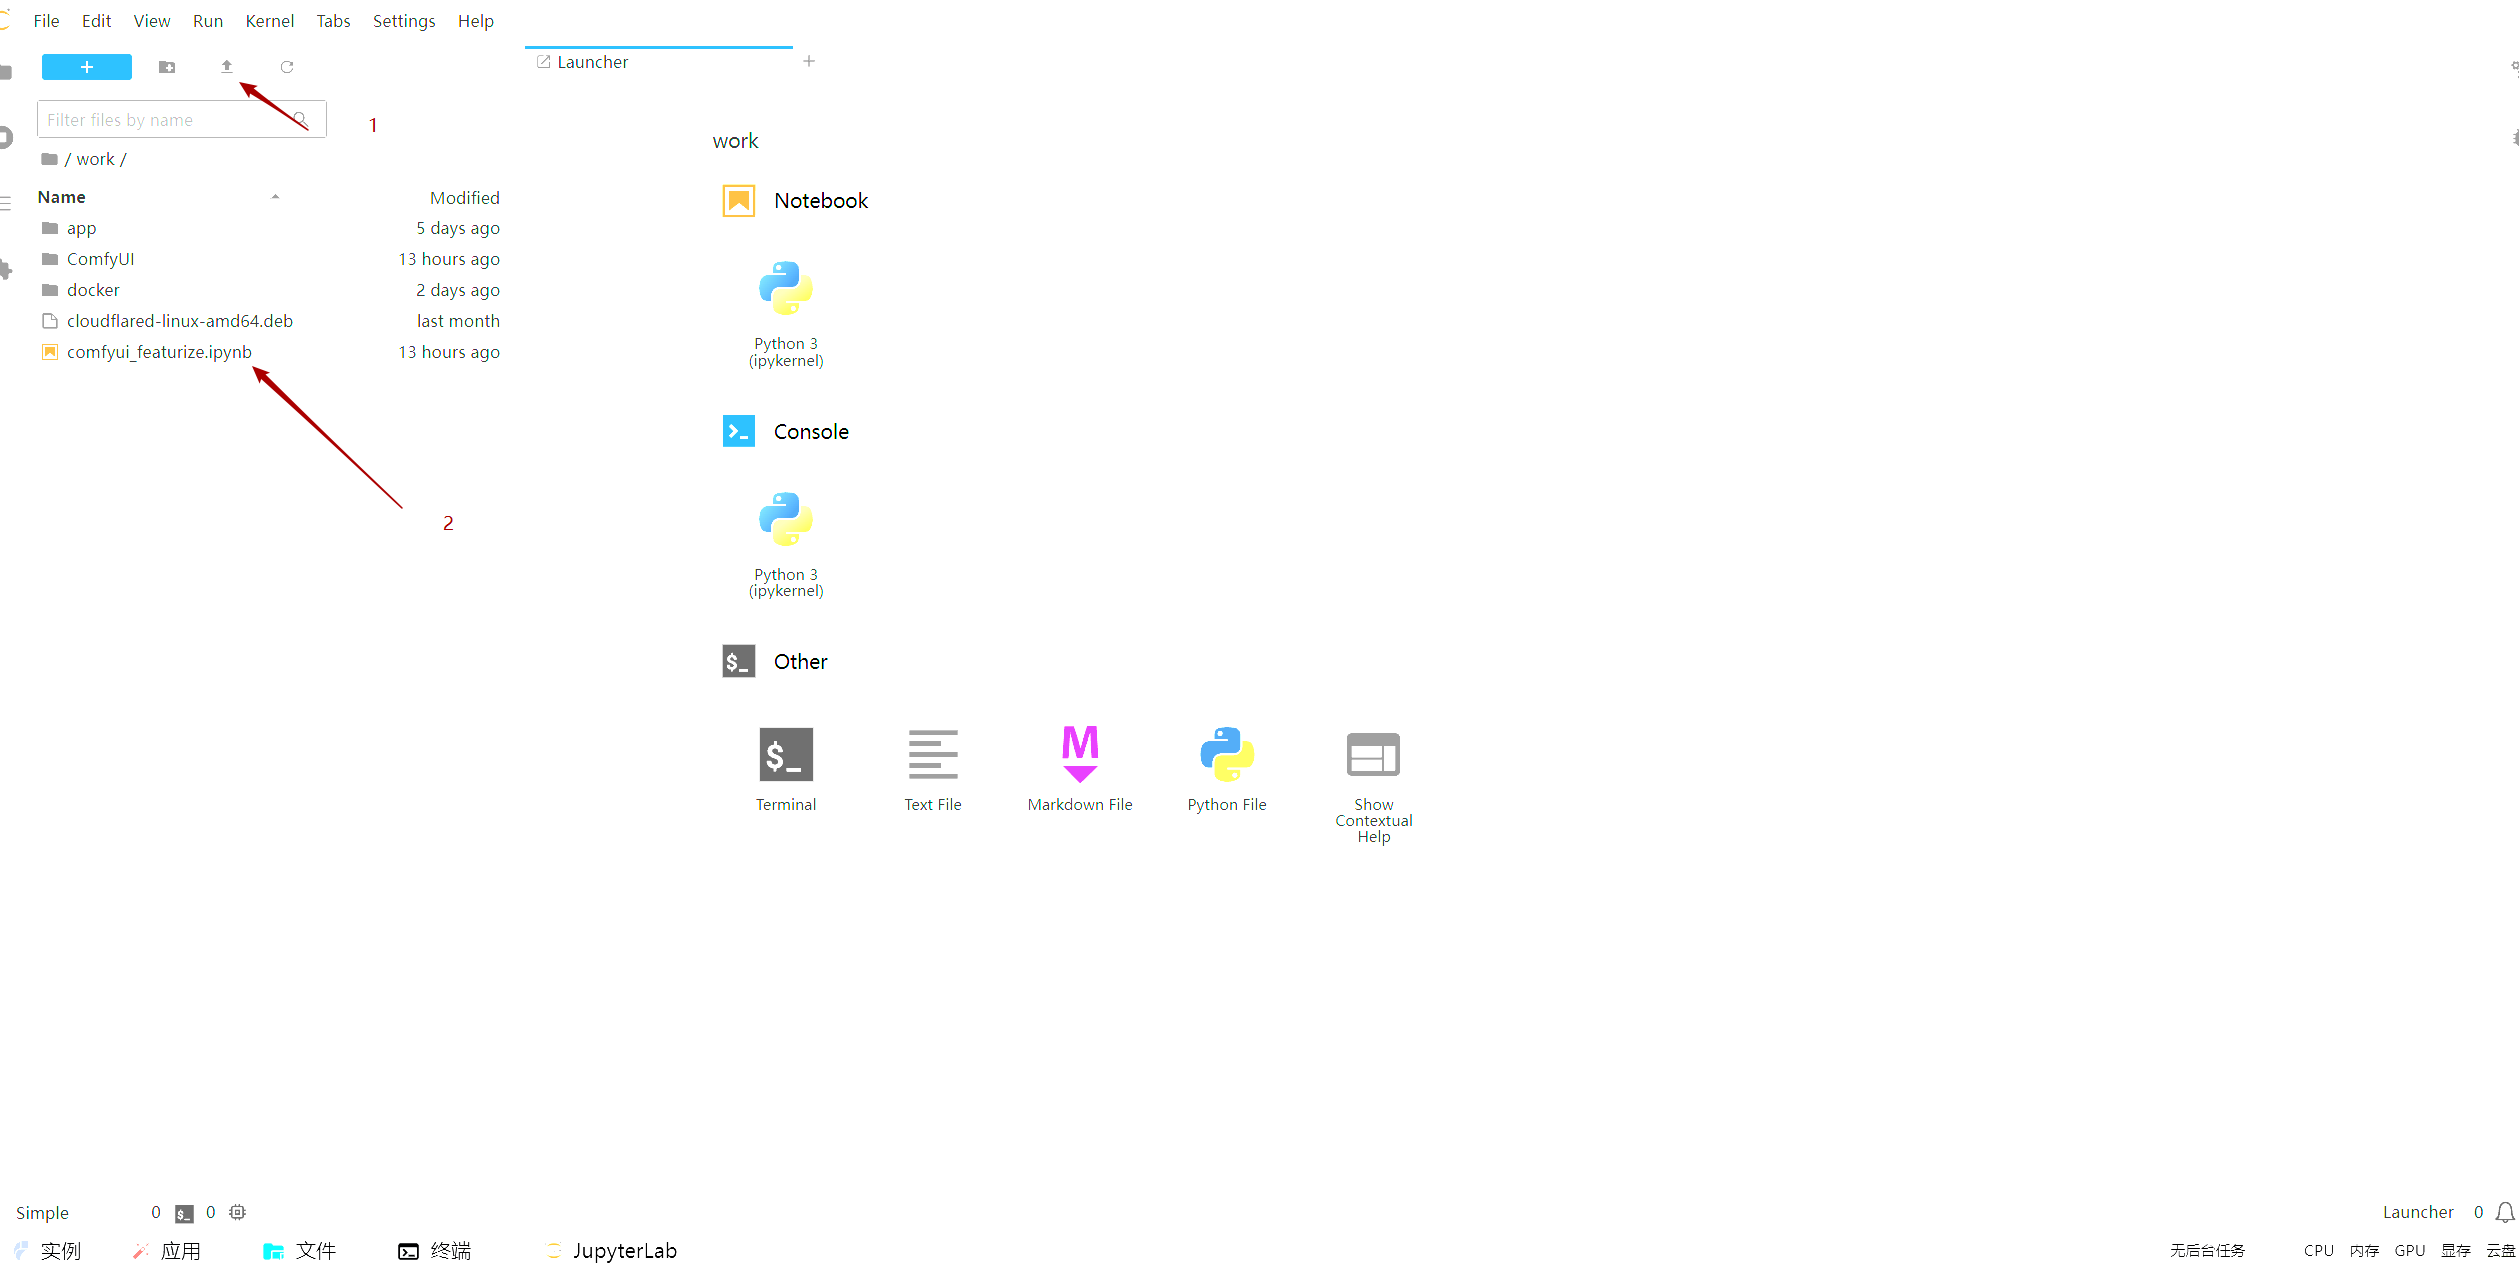
 2. 上传并打开notebook文件
打开工作空间,选择文件夹,上传comfyui_featurize.ipynb

界面使用
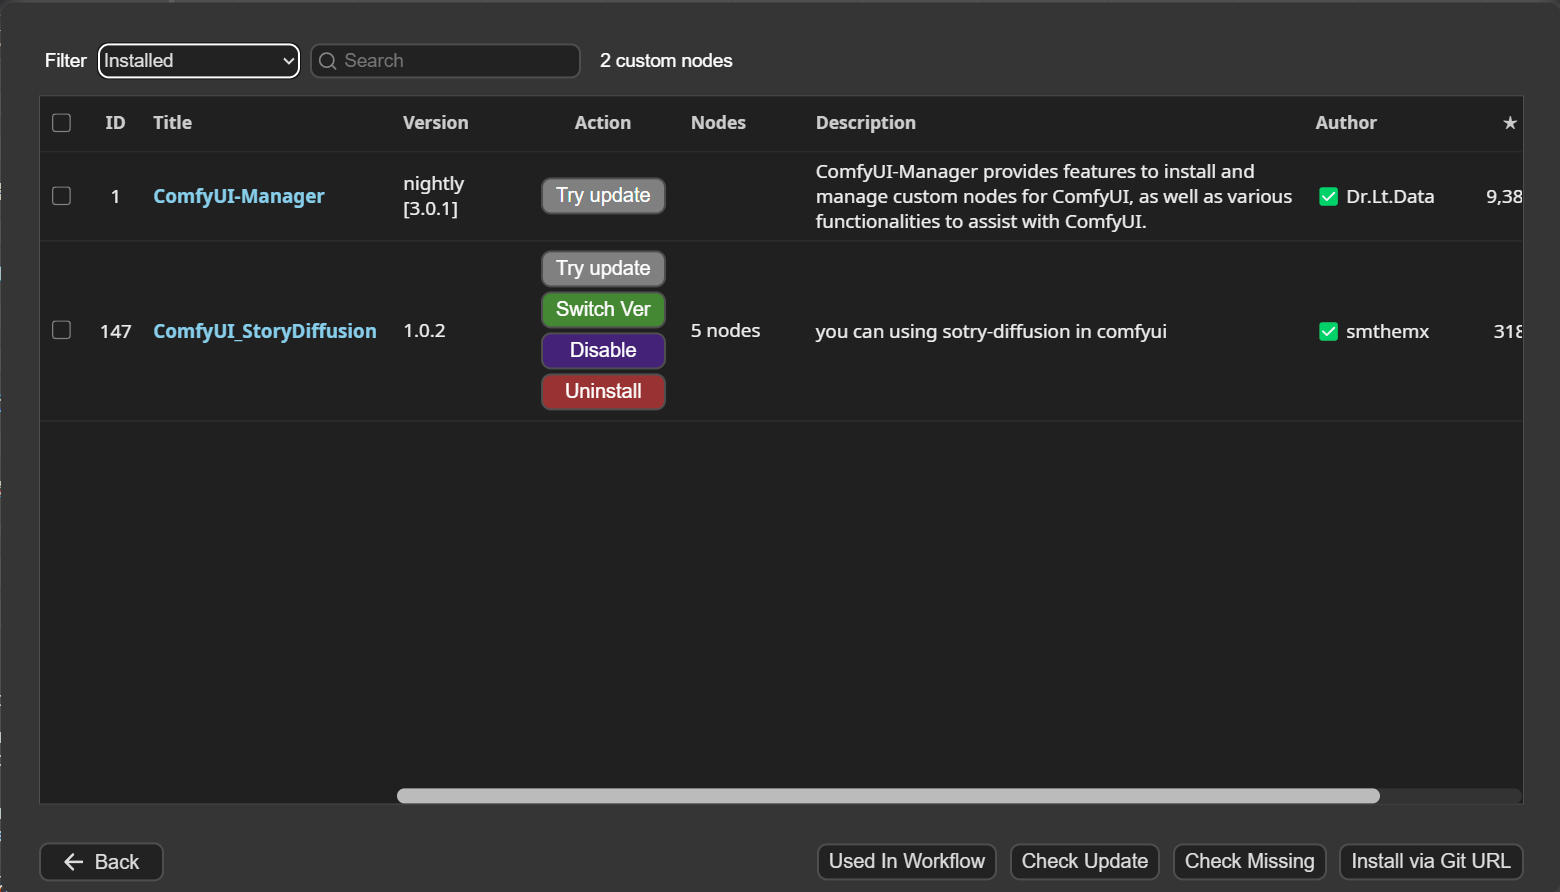
安装Custom Node
点击”Manager->node manager”, 安装ComfyUI_StoryDiffusion
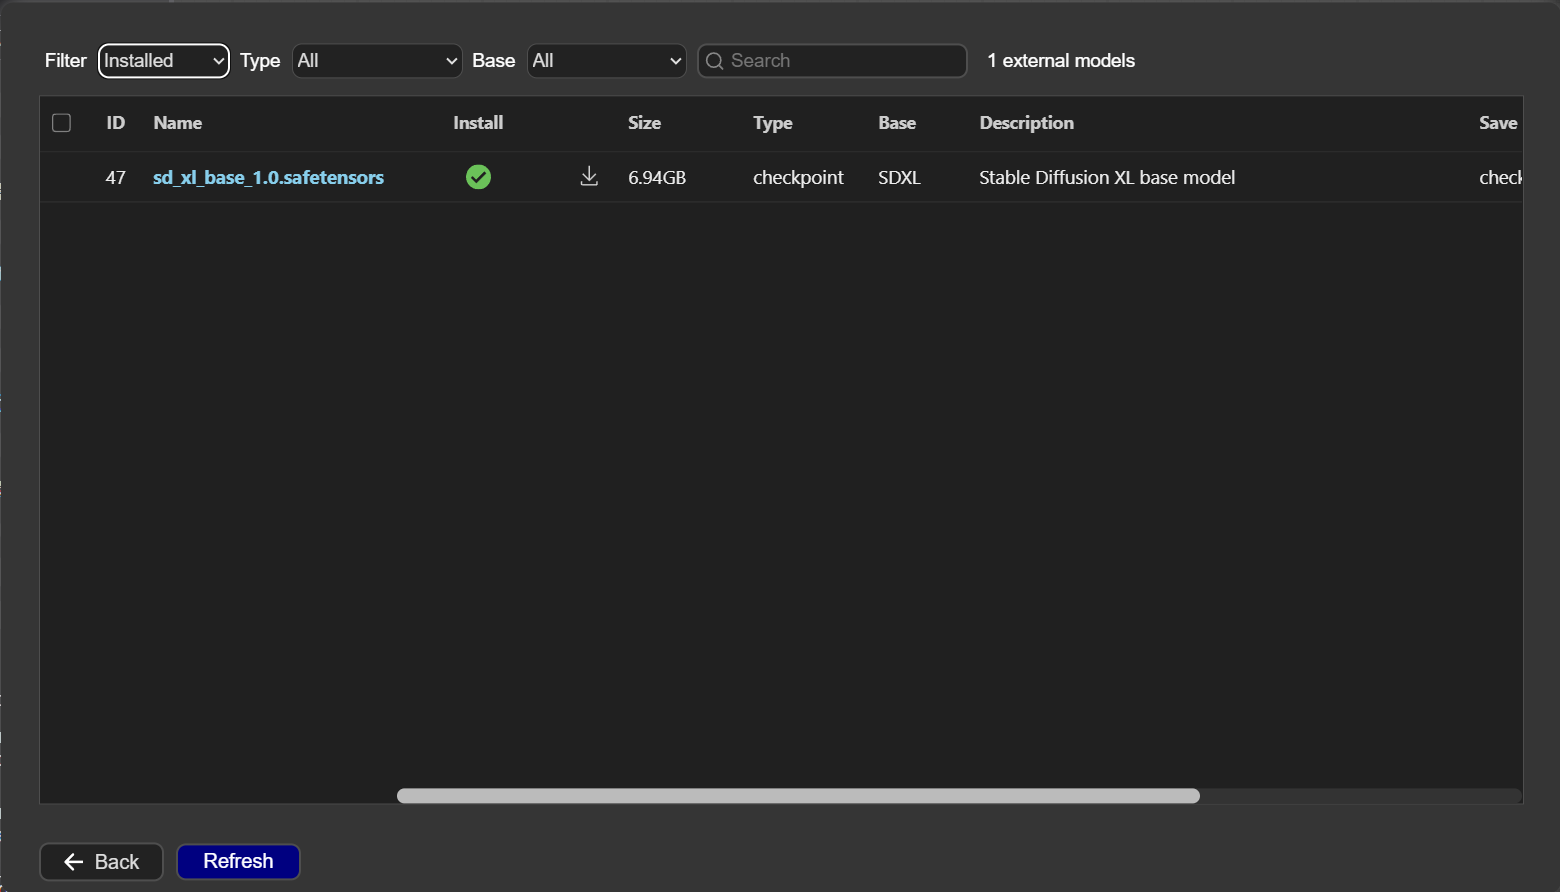
安装模型
点击”Manager->model manager”, 安装sd_xl_base_1.0.safetensors
执行工作流
点击 “工作流->打开”,打开如下工作流,然后点击下面”执行”
{ "1": { "inputs": { "sd_type": "SDXL", "ckpt_name": "SDXL/sd_xl_base_1.0.safetensors", "character_weights": "none", "lora": "none", "lora_scale": 0.8, "trigger_words": "best quality", "scheduler": "Euler", "model_type": "txt2img", "id_number": 2, "sa32_degree": 0.5, "sa64_degree": 0.5, "img_width": 768, "img_height": 768 }, "class_type": "Storydiffusion_Model_Loader", "_meta": { "title": "Storydiffusion_Model_Loader" } }, "2": { "inputs": { "info": [ "1", 1 ], "character_prompt": "[Taylor] a woman img, wearing a white T-shirt, blue loose hair.\n[Lecun] a man img,wearing a suit,black hair.", "scene_prompts": "[Taylor]wake up in the bed,medium shot;\n[Taylor]have breakfast by the window;\n[Lecun] drving on the road,medium shot;\n[Lecun]work in the company.", "split_prompt": "", "negative_prompt": "bad anatomy, bad hands, missing fingers, extra fingers, three hands, three legs, bad arms, missing legs, missing arms, poorly drawn face, bad face, fused face, cloned face, three crus, fused feet, fused thigh, extra crus, ugly fingers, horn,amputation, disconnected limbs", "img_style": "No_style", "seed": 1185510095, "steps": 20, "cfg": 7, "ip_adapter_strength": 0.5, "style_strength_ratio": 20, "encoder_repo": "laion/CLIP-ViT-bigG-14-laion2B-39B-b160k", "role_scale": 0.8, "mask_threshold": 0.5, "start_step": 5, "save_character": false, "controlnet_model_path": "none", "controlnet_scale": 0.8, "layout_guidance": false, "pipe": [ "1", 0 ] }, "class_type": "Storydiffusion_Sampler", "_meta": { "title": "Storydiffusion_Sampler" } }, "3": { "inputs": { "filename_prefix": "ComfyUI", "images": [ "2", 0 ] }, "class_type": "SaveImage", "_meta": { "title": "保存图像" } }}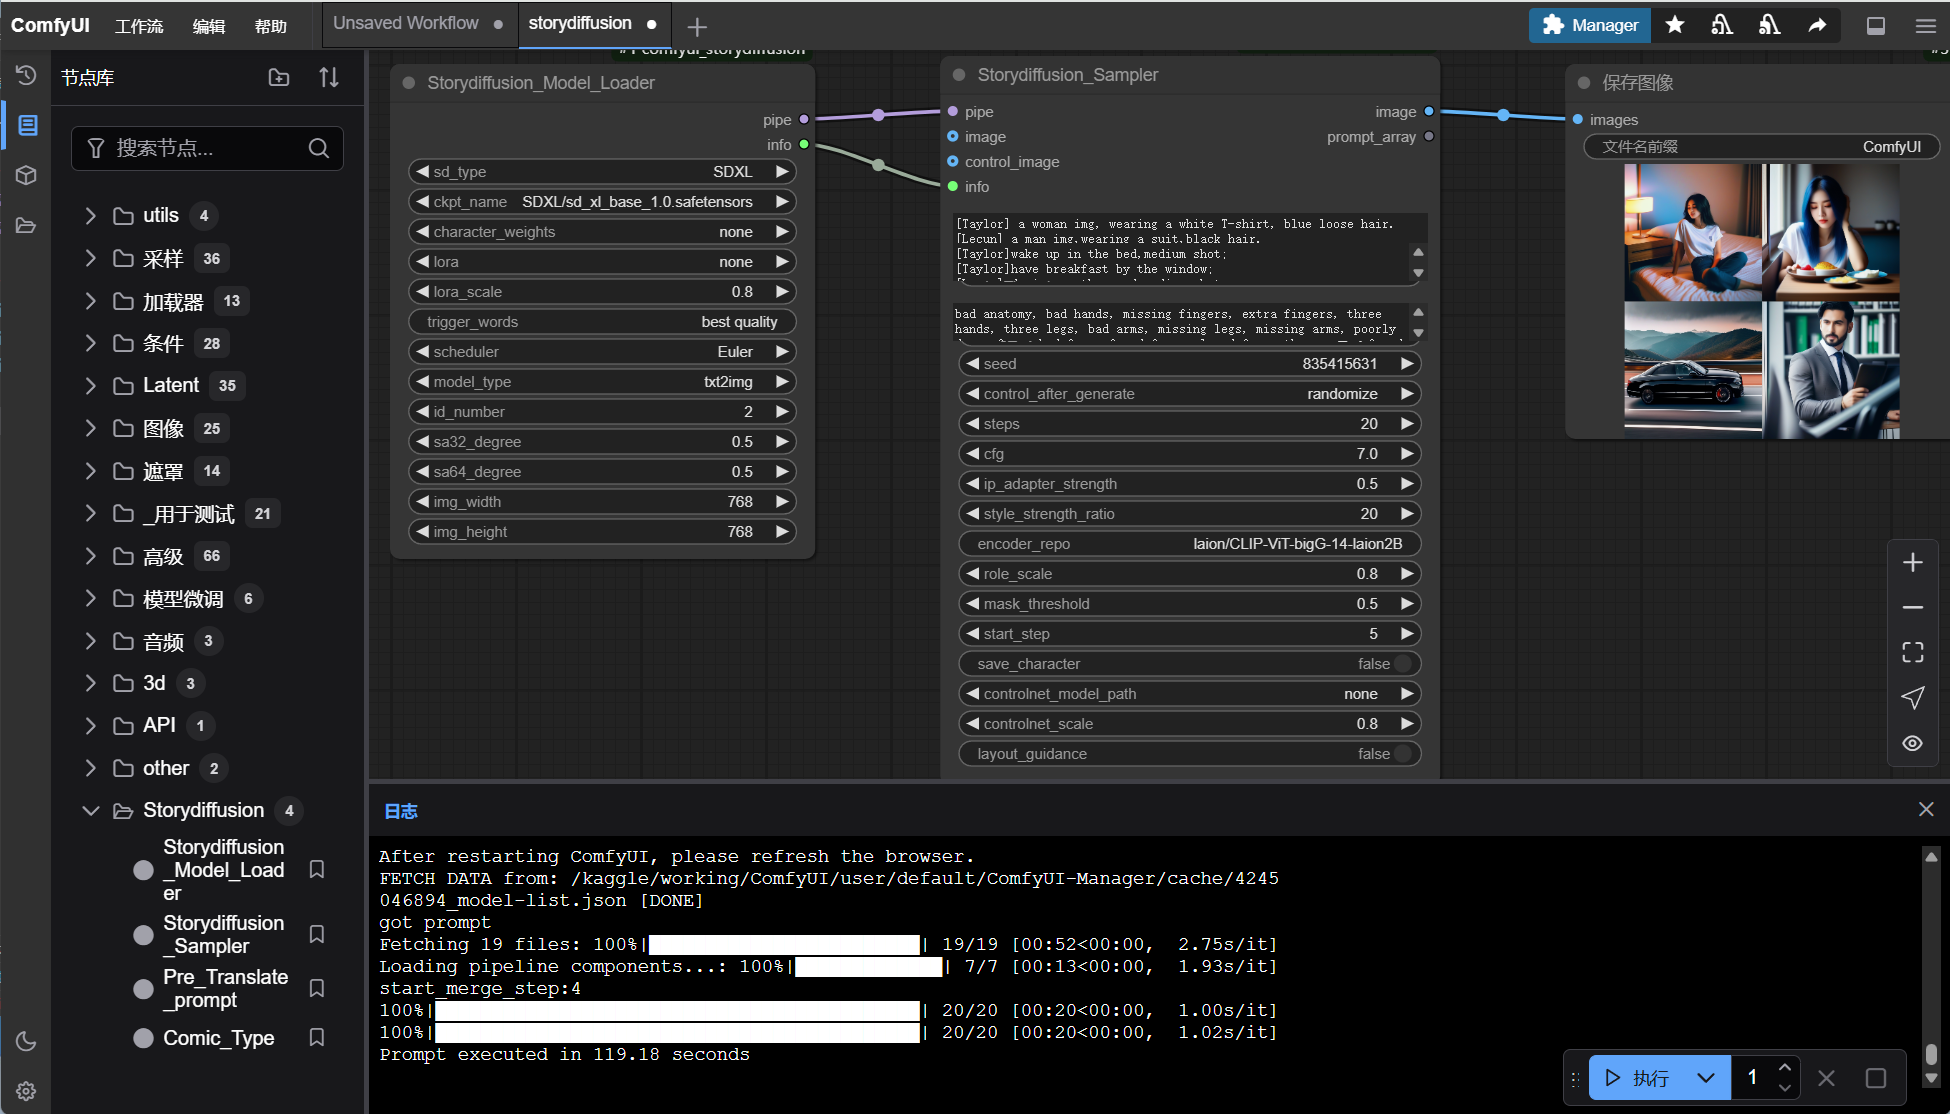
api使用
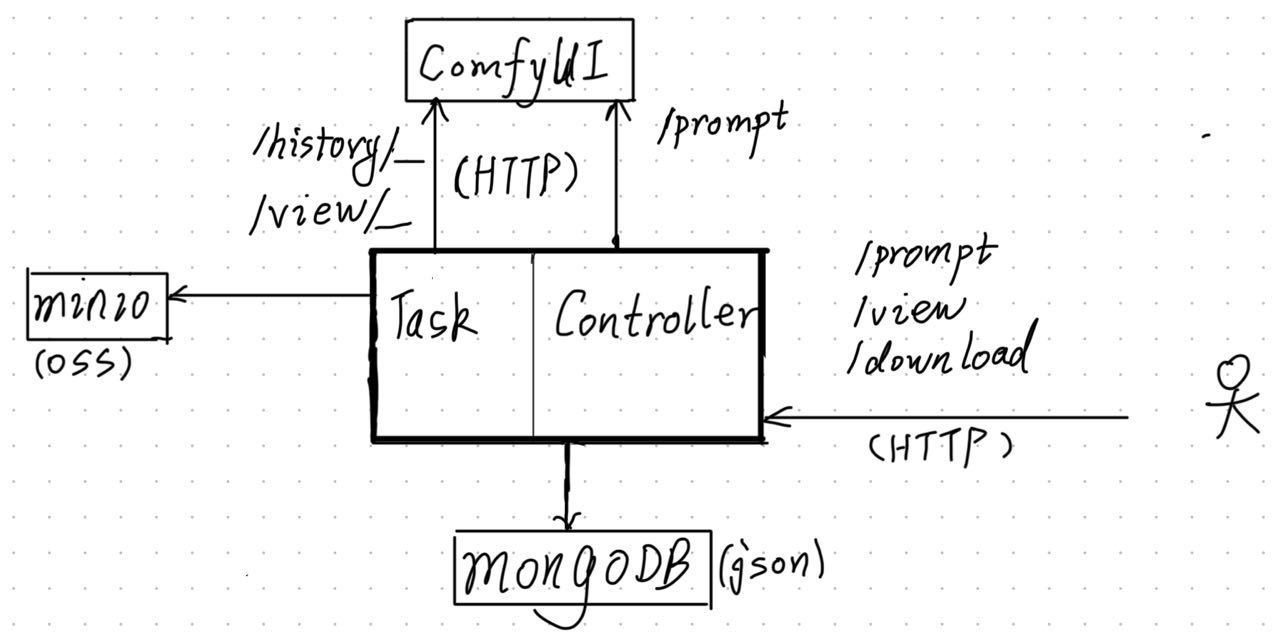
ComfyUI有三个API可用:
POST /prompt提交工作流GET /history/{promptId}查看工作流处理历史GET /view下载生成文件
搭建java项目,通过HTTP创建工作流,定时任务同步结果,MongoDB存储JSON,Minio存储生成的图片
安装配置依赖的服务
利用Docker Compose启动MongoDB和Minio服务
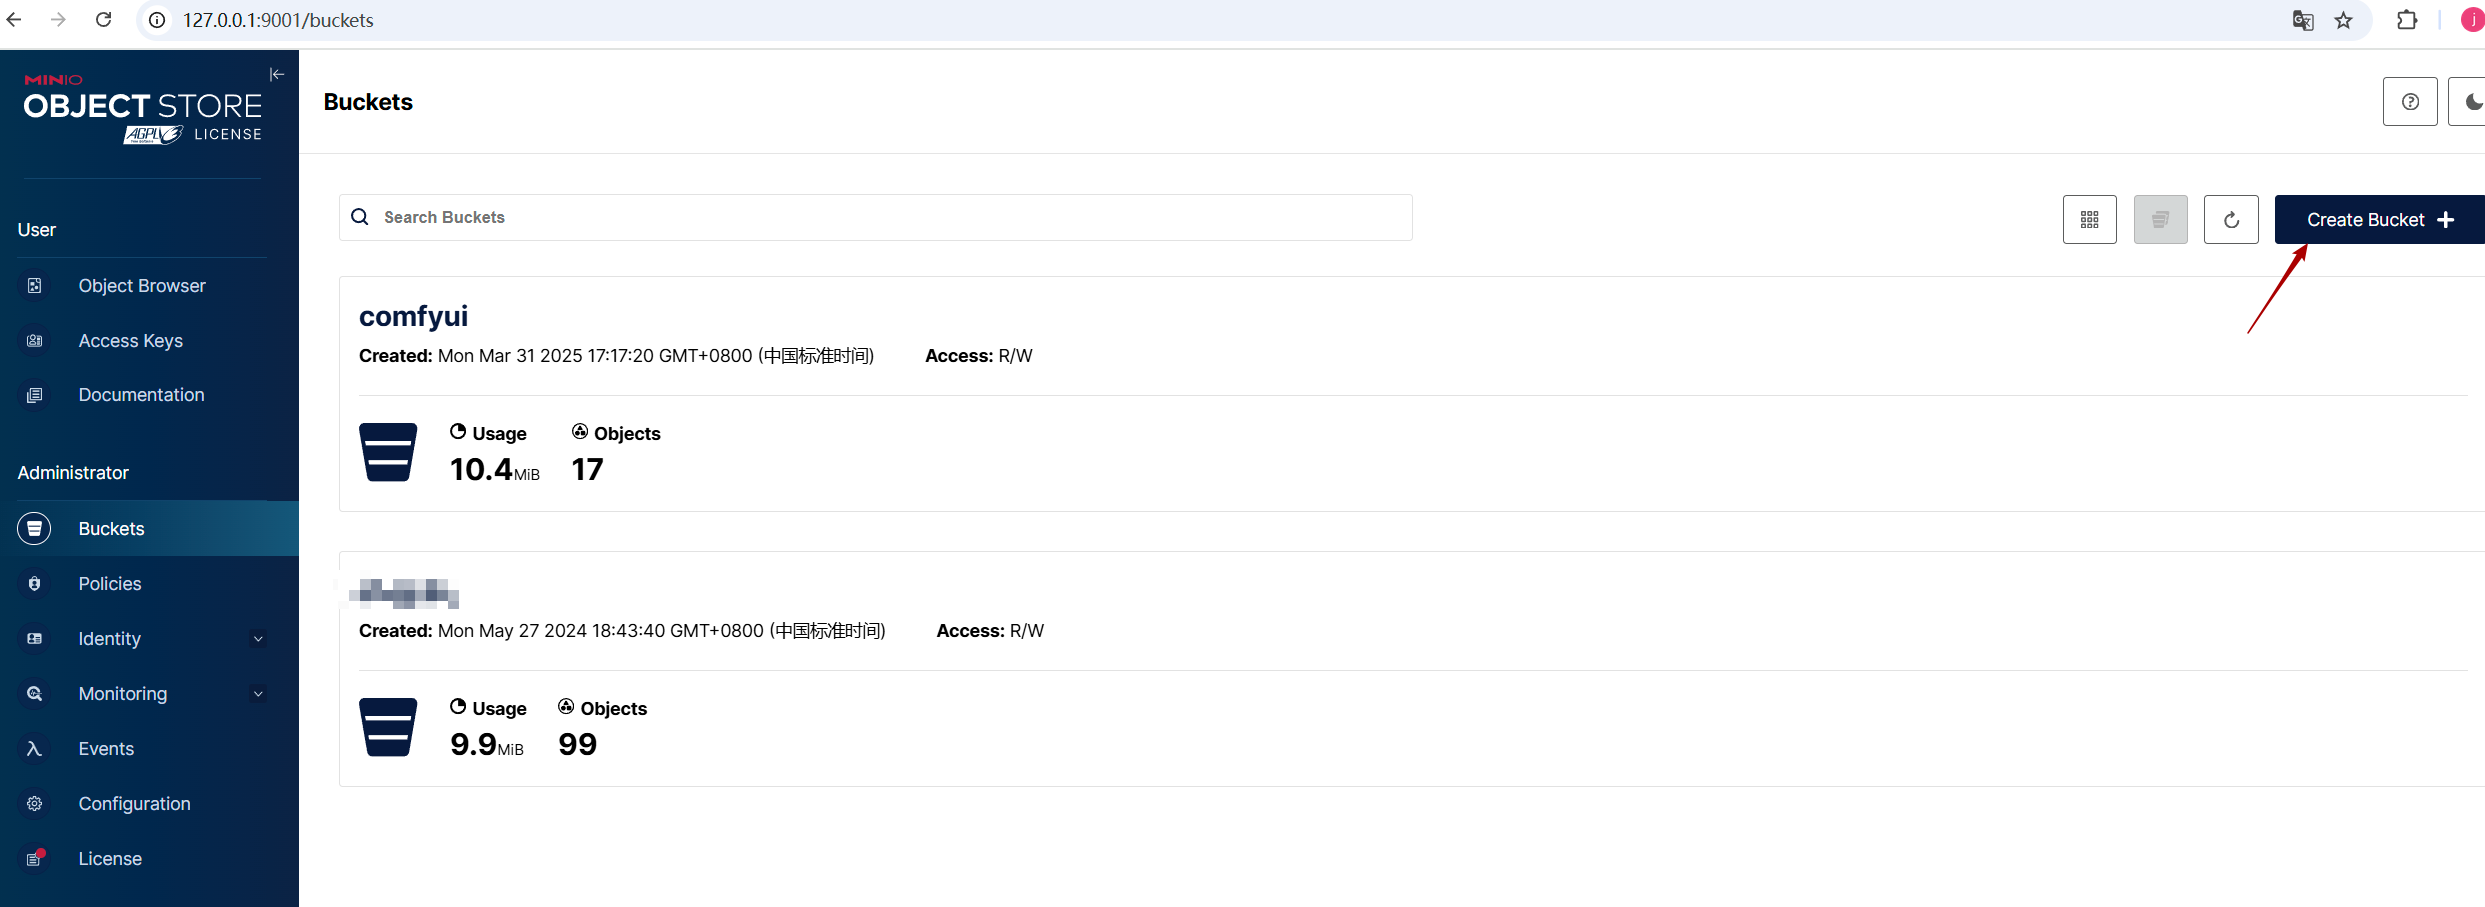
version : '3.8'name: workserverservices: mongo: image: mongodb/mongodb-community-server:5.0.24-ubuntu2004 container_name: mongo restart: on-failure:3 ports: - "27017:27017" volumes: - D:\DockerData\MongoData\db:/data/db - D:\DockerData\MongoData\configdb:/data/configdb minio: container_name: minio image: quay.io/minio/minio ports: - "9000:9000" - "9001:9001" environment: - "MINIO_ROOT_USER=xxxx" - "MINIO_ROOT_PASSWORD=xxxxxx" command: server --console-address ":9001" /data volumes: - D:\DockerData\MinioData:/data healthcheck: test: ["CMD", "mc", "ready", "local"] interval: 5s timeout: 5s retries: 5访问minio,创建专门的bucket
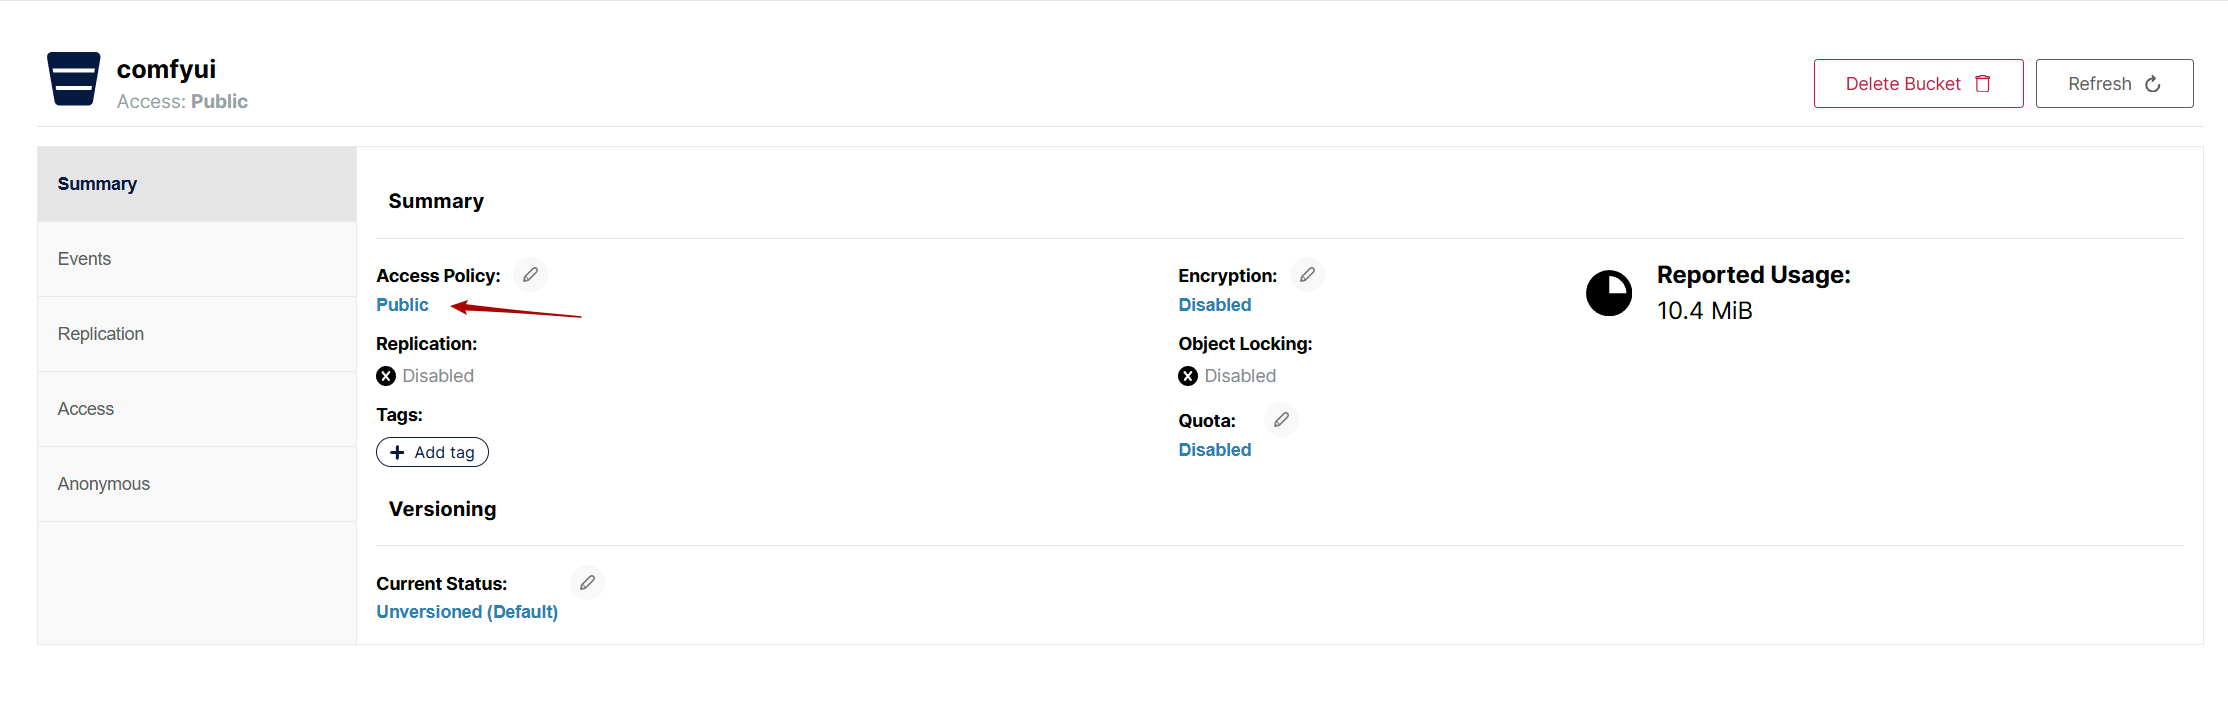
 访问策略设置为public
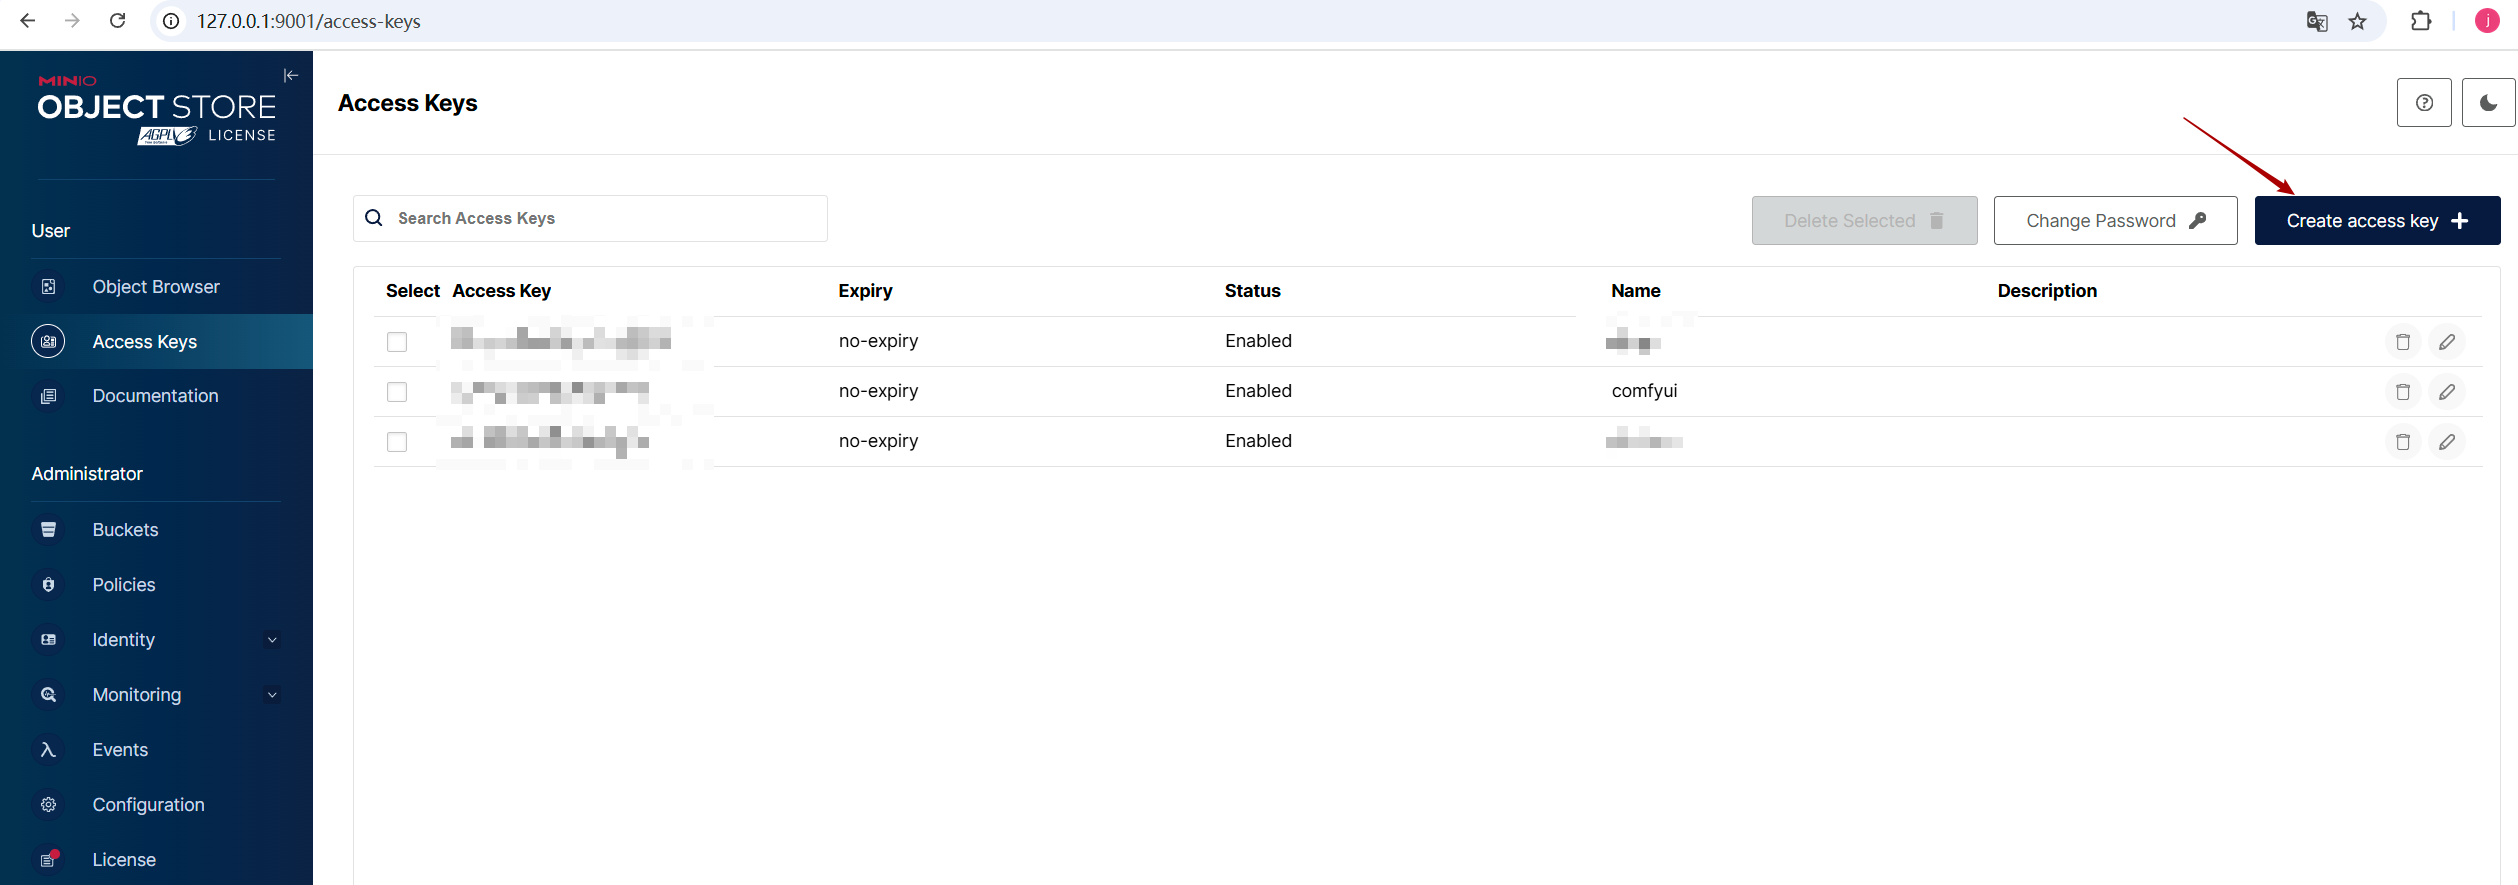
 创建accesskey
配置java项目
添加依赖的jar包
<dependencies> <dependency> <groupId>org.springframework.boot</groupId> <artifactId>spring-boot-starter</artifactId> </dependency>
<!--web--> <dependency> <groupId>org.springframework.boot</groupId> <artifactId>spring-boot-starter-web</artifactId> </dependency> <!-- https://mvnrepository.com/artifact/org.springframework.boot/spring-boot-starter-data-mongodb --> <dependency> <groupId>org.springframework.boot</groupId> <artifactId>spring-boot-starter-data-mongodb</artifactId> </dependency>
<!-- 免getter/setter --> <dependency> <groupId>org.projectlombok</groupId> <artifactId>lombok</artifactId> </dependency> <!-- io--> <!-- https://mvnrepository.com/artifact/commons-io/commons-io --> <dependency> <groupId>commons-io</groupId> <artifactId>commons-io</artifactId> </dependency>
<!-- https://mvnrepository.com/artifact/com.squareup.okhttp3/logging-interceptor --> <dependency> <groupId>com.squareup.okhttp3</groupId> <artifactId>logging-interceptor</artifactId> </dependency>
<dependency> <groupId>com.squareup.okhttp3</groupId> <artifactId>okhttp</artifactId> </dependency> <!-- https://mvnrepository.com/artifact/org.jetbrains.kotlin/kotlin-stdlib --> <dependency> <groupId>org.jetbrains.kotlin</groupId> <artifactId>kotlin-stdlib</artifactId> </dependency> <dependency> <groupId>org.jetbrains.kotlin</groupId> <artifactId>kotlin-stdlib-common</artifactId> </dependency> <dependency> <groupId>com.squareup.retrofit2</groupId> <artifactId>retrofit</artifactId> </dependency> <!-- https://mvnrepository.com/artifact/org.reactivestreams/reactive-streams --> <dependency> <groupId>org.reactivestreams</groupId> <artifactId>reactive-streams</artifactId> </dependency> <!-- https://mvnrepository.com/artifact/com.squareup.retrofit2/converter-scalars --> <dependency> <groupId>com.squareup.retrofit2</groupId> <artifactId>converter-scalars</artifactId> </dependency> <!-- https://mvnrepository.com/artifact/com.squareup.retrofit2/converter-jackson --> <dependency> <groupId>com.squareup.retrofit2</groupId> <artifactId>converter-jackson</artifactId> </dependency> <!-- https://mvnrepository.com/artifact/com.squareup.retrofit2/adapter-rxjava2 --> <dependency> <groupId>com.squareup.retrofit2</groupId> <artifactId>adapter-rxjava2</artifactId> </dependency> <!-- https://mvnrepository.com/artifact/io.minio/minio --> <dependency> <groupId>io.minio</groupId> <artifactId>minio</artifactId> </dependency>
<!--日志--> <dependency> <groupId>org.springframework.boot</groupId> <artifactId>spring-boot-starter-logging</artifactId> </dependency>
<!--测试--> <dependency> <groupId>org.springframework.boot</groupId> <artifactId>spring-boot-starter-test</artifactId> </dependency>
<dependency> <groupId>junit</groupId> <artifactId>junit</artifactId> <scope>test</scope> </dependency> </dependencies>配置所需变量
spring: application: name: ComfyUIAPI data: mongodb: host: 127.0.0.1 port: 27017 database: comfyui #username: admin #password: 123456logging: config: classpath:logback/logback.xmlserver: port: 8080comfyui: baseurl: https://xxxxxxxxxxxxx/ client-id: xxxxxxxxxxxxxxxxxxxxxxxxxxxxxxminio: host: http://127.0.0.1:9000 bucket: comfyui access-key: ILxBNsjjYoBBaRqFr3FZ secret-key: xxxxxxxxxxxxxxxxxxxxxxxxxxxxxxxx配置访问API和Minio的bean
@Configuration@Log4j2public class ComfyuiConfig {
@Value("${comfyui.baseurl}") private String baseurl;
/** * comfyui http api * @return */ @Bean public IComfyuiAPI comfyuiAPI(){ OkHttpClient okHttpClient = new OkHttpClient.Builder() .addInterceptor(new Interceptor() { @Override public Response intercept(Chain chain) throws IOException { return chain.proceed(chain.request().newBuilder() .addHeader("X-Pinggy-No-Screen", "X-Pinggy-No-Screen") .build()); } }) .addInterceptor(new HttpLoggingInterceptor().setLevel(HttpLoggingInterceptor.Level.BODY))//日志 .build();
Retrofit retrofit = new Retrofit.Builder().baseUrl(baseurl). addConverterFactory(ScalarsConverterFactory.create()) .addConverterFactory(JacksonConverterFactory.create()) .addCallAdapterFactory(RxJava2CallAdapterFactory.create()) .client(okHttpClient) .build();
return retrofit.create(IComfyuiAPI.class); }}public interface IComfyuiAPI {
/** * 提交工作流 * @param body * @return */ @POST("/prompt") @Headers({"content-type: application/json"}) Call<JsonNode> prompt(@Body String body);
/** * 工作流执行历史 * @param promptId * @return */ @GET("/history/{promptId}") @Headers({"content-type: application/json"}) Call<JsonNode> history(@Path("promptId") String promptId);
/** * 下载文件二进制数据 * @param subfolder * @param filename * @param type * @return */ @GET("/view") @Headers({"content-type: application/json"}) Call<ResponseBody> view(@Query("subfolder") String subfolder, @Query("filename") String filename, @Query("type")String type);
}@Configuration@Log4j2public class MinioConfig {
@Value("${minio.host}") private String host;
@Value("${minio.bucket}") private String bucket;
@Value("${minio.access-key}") private String accessKey;
@Value("${minio.secret-key}") private String secretKey;
@Bean public MinioClient minioClient(){ OkHttpClient okHttpClient = new OkHttpClient.Builder() .addInterceptor(new HttpLoggingInterceptor().setLevel(HttpLoggingInterceptor.Level.BODY))//日志 .build(); return new MinioClient.Builder().httpClient(okHttpClient).endpoint(host).credentials(accessKey,secretKey).build();
}}提供HTTP接口
@Controller@RequestMapping("workflow")public class WorkflowController {
@Autowired private IWrokflowService wrokflowService;
@Autowired private IComfyuiAPI comfyuiAPI;
@Autowired private MinioClient minioClient;
@Value("${comfyui.client-id}") private String clientId;
@Value("${minio.host}") private String host;
@Value("${minio.bucket}") private String bucket;
/** * 提交工作流 * @param body * @return 工作流id */ @PostMapping("/prompt") public ResponseEntity<Map<String,Object>> prompt(@RequestBody Map<String,Object> body){ HashMap<String, Object> ret = new HashMap<>();
Map<String,Object> creq = new HashMap<>(); creq.put("prompt",body); creq.put("clientId",clientId); try { Response<JsonNode> promptResp = comfyuiAPI.prompt((new ObjectMapper()).writeValueAsString(creq)).execute(); if(promptResp.isSuccessful()){ String promptId = promptResp.body().get("prompt_id").asText(); WorkFlow workFlow = new WorkFlow(); workFlow.setCompleted(false); workFlow.setPrompt(body); workFlow.setPromptId(promptId); wrokflowService.save(workFlow);//存入MongoDB
ret.put("promptId",promptId); } } catch (Exception e) { return ResponseEntity.status(HttpStatus.INTERNAL_SERVER_ERROR).build(); } return ResponseEntity.ok(ret); }
/** * 查询结果 * @param promptId * @param response * @return 多个图片的压缩包 */ @GetMapping("/download/{promptId}") public ResponseEntity<String> download(@PathVariable("promptId") String promptId, HttpServletResponse response){ try { Optional<WorkFlow> workFlow = wrokflowService.findByPromptId(promptId); if(workFlow.isPresent() && workFlow.get().getCompleted()){ //将图片放到压缩文件中 String zipfilename =promptId + ".zip"; File zipFile = File.createTempFile(promptId,"zip"); FileOutputStream fos = new FileOutputStream(zipFile) ; ZipOutputStream zos= new ZipOutputStream(fos) ;
for (String image : workFlow.get().getImages()) { //通过MINIO获取文件 GetObjectResponse getres = minioClient.getObject(GetObjectArgs.builder().bucket(bucket).object(image).build()); ByteArrayOutputStream byteArrayOutputStream = new ByteArrayOutputStream(); IOUtils.copy(getres,byteArrayOutputStream); //写入一个条目,我们需要给这个条目起个名字,相当于起一个文件名称 zos.putNextEntry(new ZipEntry(image)); //往这个条目中写入一定的数据 zos.write(byteArrayOutputStream.toByteArray()); //关闭条目 zos.closeEntry(); }
zos.close();
response.reset(); response.setContentType("application/octet-stream"); response.setCharacterEncoding("utf-8"); response.setContentLength((int) zipFile.length()); response.setHeader("Content-Disposition", "attachment;filename=" + zipfilename );
ServletOutputStream outputStream = response.getOutputStream(); IOUtils.copy(new FileInputStream(zipFile), outputStream); outputStream.flush(); } } catch (Exception e) { e.printStackTrace(); return ResponseEntity.ok("fail"); } return ResponseEntity.ok("success"); } /** * 查询结果 * @param promptId * @param response * @return 图片链接列表 */ @GetMapping("/view/{promptId}") public ResponseEntity<List<String>> view(@PathVariable("promptId") String promptId, HttpServletResponse response){ Optional<WorkFlow> workFlow = wrokflowService.findByPromptId(promptId); if(workFlow.isPresent() && workFlow.get().getCompleted()){ return ResponseEntity.ok(workFlow.get().getImages().stream().map(s->String.format("%s/%s/%s",host,bucket,s)).collect(Collectors.toList())); } return ResponseEntity.ok(new ArrayList<>()); }}通过定时任务,查询处理结果存入MongoDB和Minio
public void syncResultTask() { WorkFlow param = new WorkFlow(); param.setCompleted(false);//查询未完成的记录 Pageable pg = PageRequest.of(0,100); Page<WorkFlow> all = workFlowRepository.findAll(Example.of(param), pg); for (WorkFlow workFlow : all.getContent()) { try { log.info("begin workFlow={}",workFlow); retrofit2.Response<JsonNode> hisResponse = comfyuiAPI.history(workFlow.getPromptId()).execute(); JsonNode jsonNode = hisResponse.body().get(workFlow.getPromptId()); boolean completed = jsonNode.get("status").get("completed").asBoolean(false); if (completed) { JsonNode images = jsonNode.get("outputs").get("3").get("images");//得到图片路径 if (images.isArray()) { ArrayNode arrayNode = (ArrayNode) images; List<String> imageList = new ArrayList<>(); for (int i = 0; i < arrayNode.size(); i++) { //获取图片的二进制数据 retrofit2.Response<okhttp3.ResponseBody> imgFile = comfyuiAPI.view(arrayNode.get(i).get("subfolder").asText(), arrayNode.get(i).get("filename").asText(), arrayNode.get(i).get("type").asText()).execute(); if (imgFile.isSuccessful()) { String filename = arrayNode.get(i).get("filename").asText(); String suffix = filename.substring(filename.indexOf(".")+1); filename = filename.substring(0,filename.indexOf("."))+System.currentTimeMillis()+"."+ suffix; //存入MongoDB minioClient.putObject(PutObjectArgs.builder() .bucket(bucket).object(filename).contentType("image/"+ suffix).stream(imgFile.body().byteStream(), imgFile.body().contentLength(),5*1024*1024) .build()); imageList.add(filename); } } workFlow.setCompleted(true); workFlow.setImages(imageList); workFlowRepository.save(workFlow); log.info("end workFlow={}",workFlow); } } } catch (Exception e) { e.printStackTrace(); } } }测试
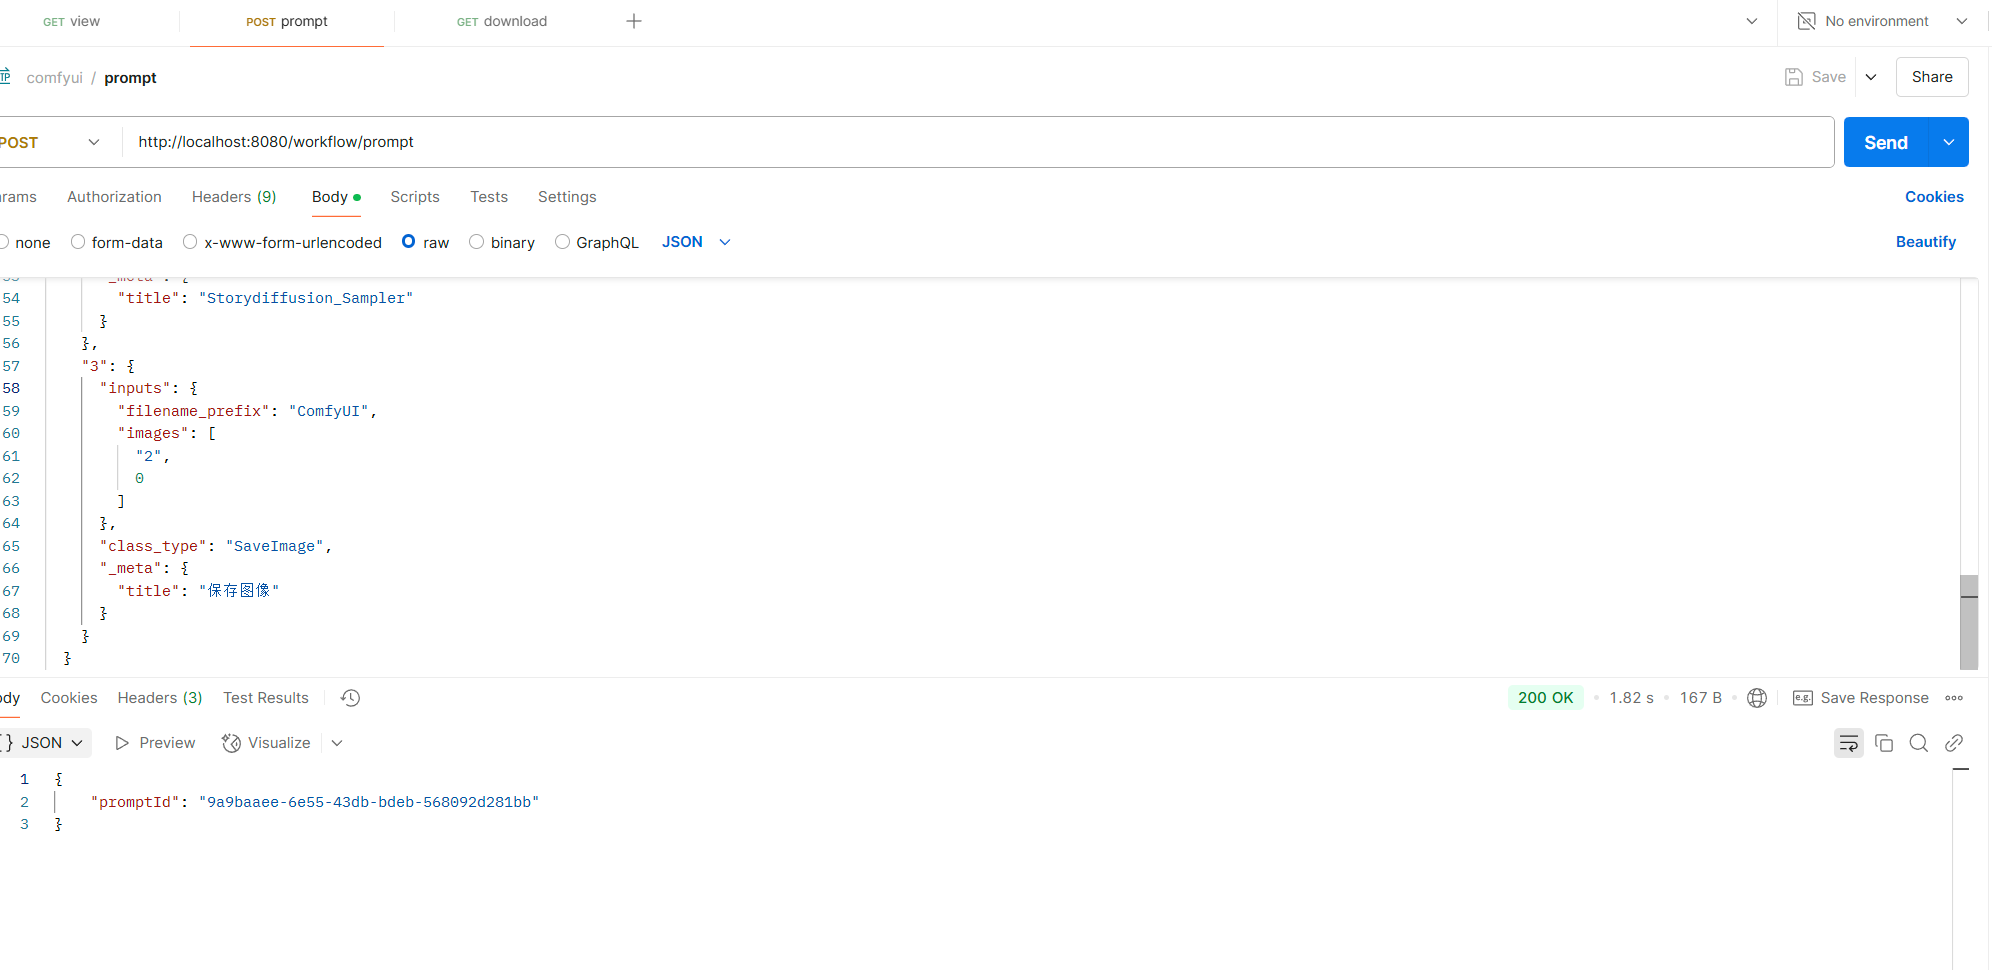
提交工作流
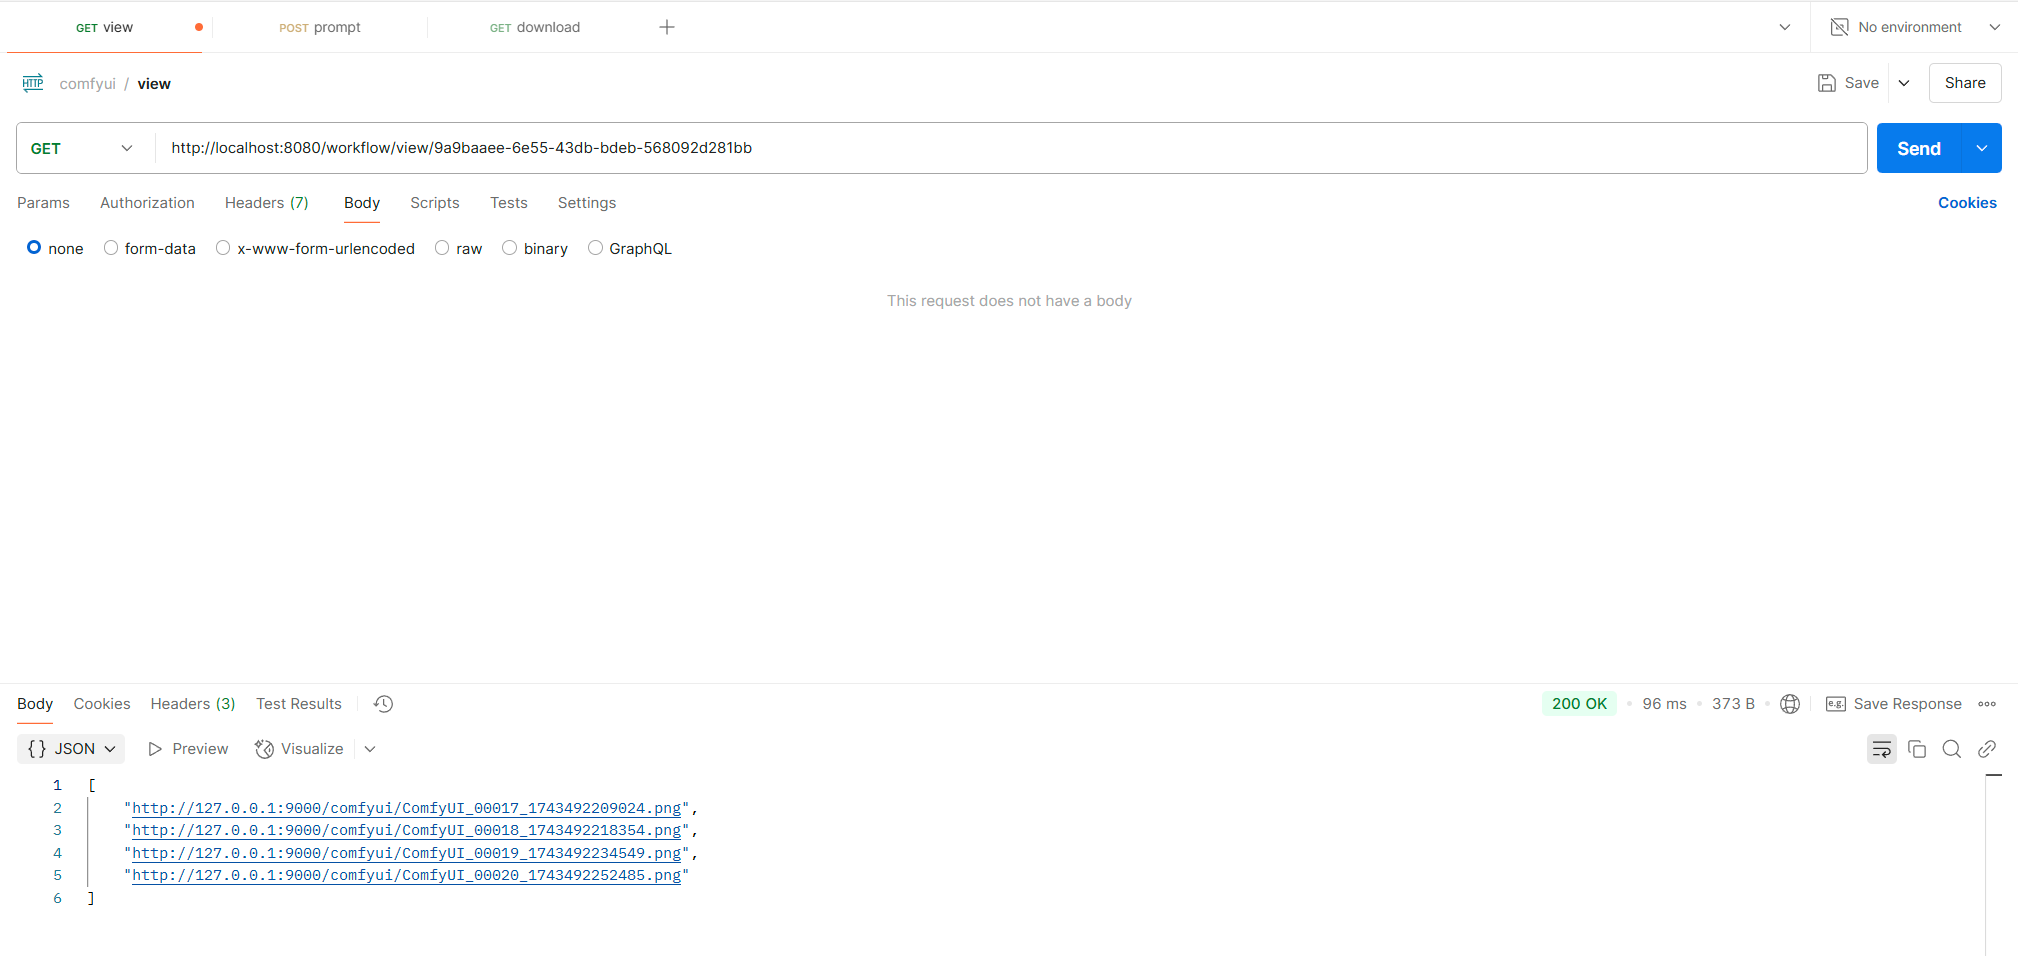
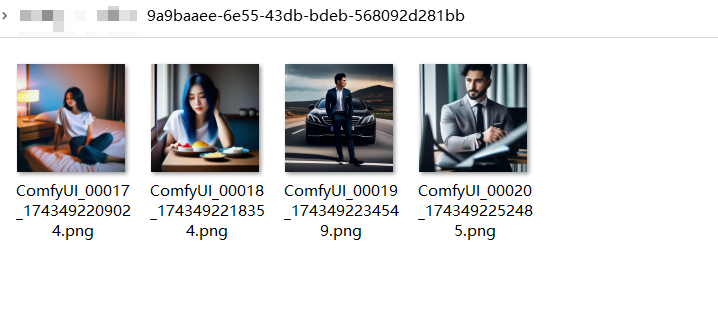
 查看生成的图片链接
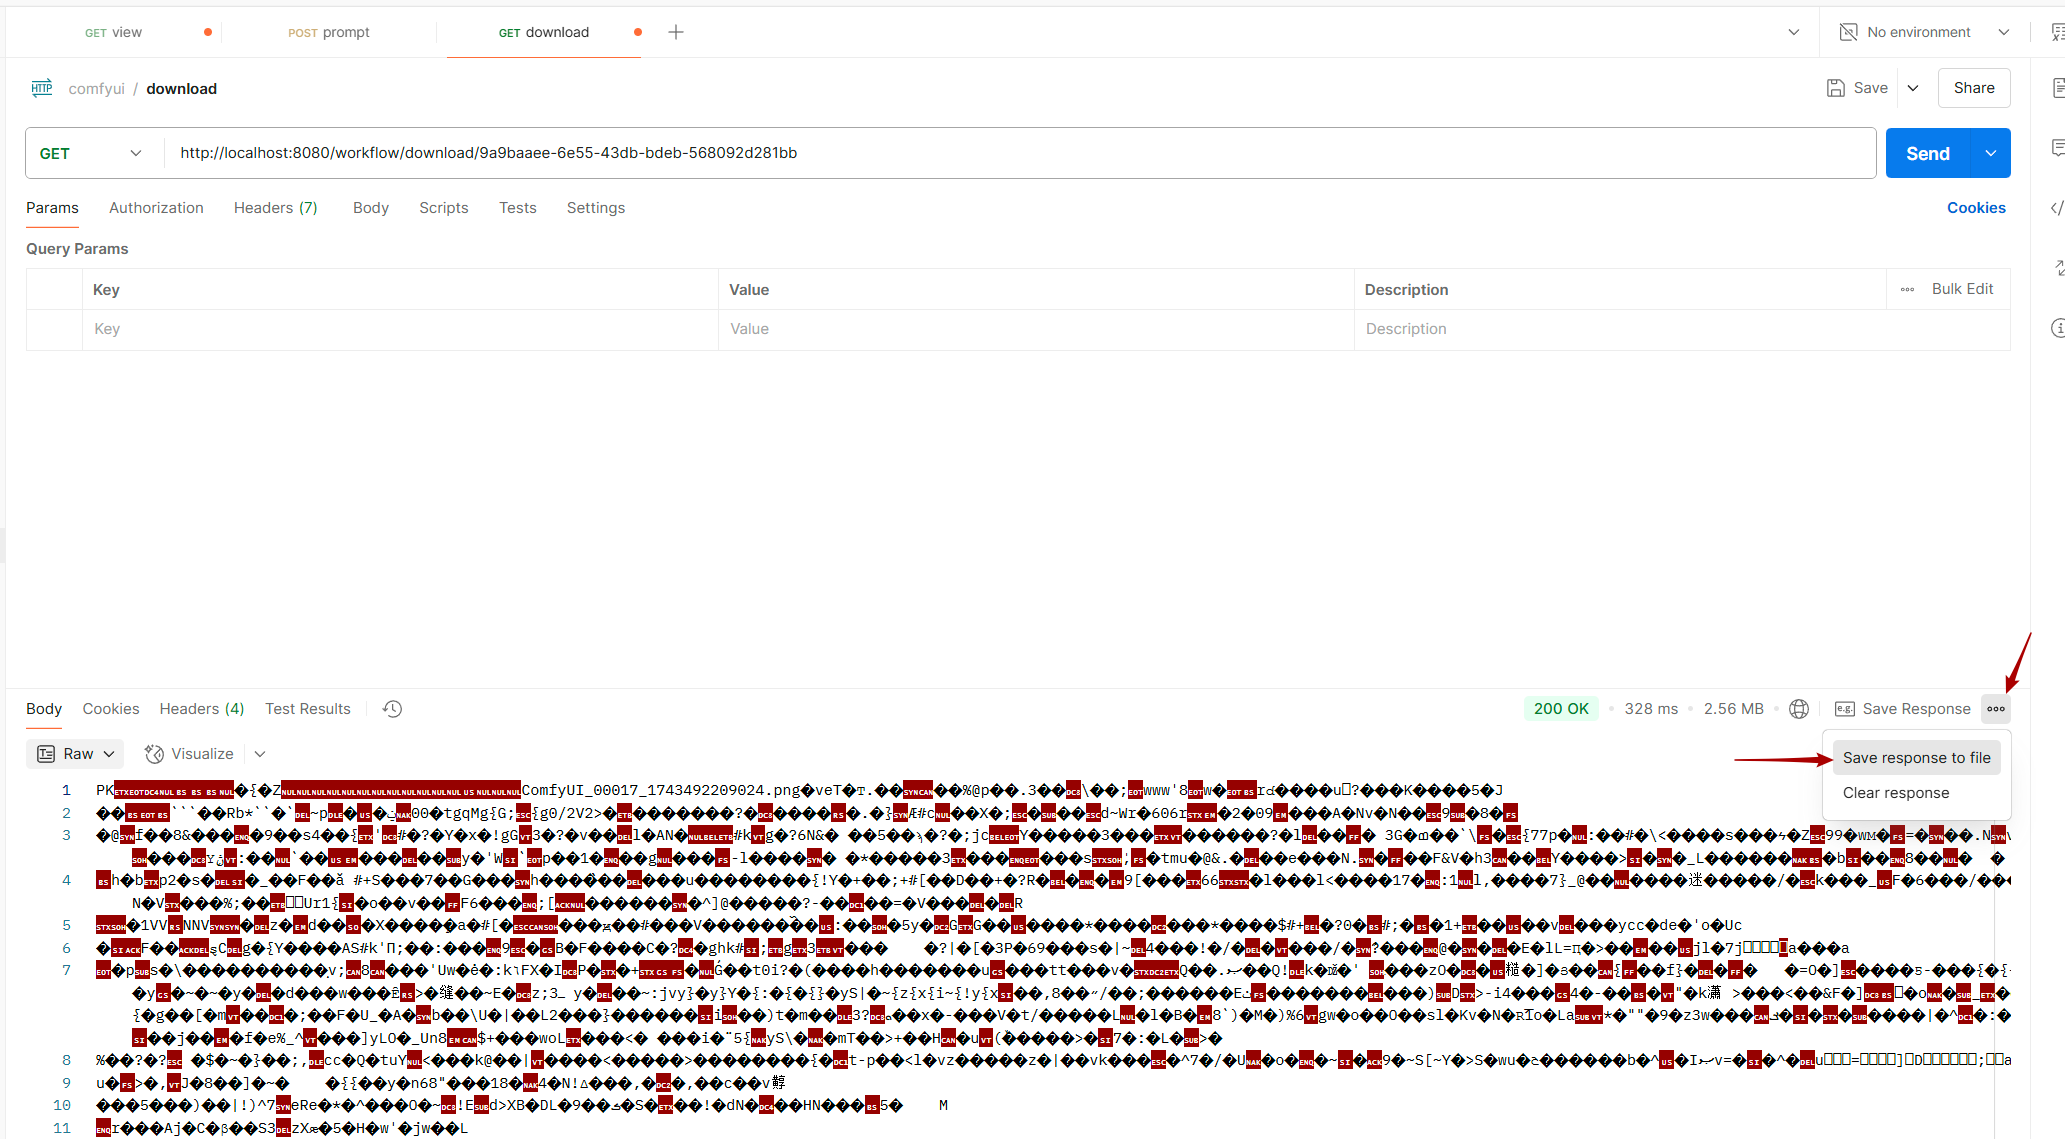
 下载生成的文件压缩包
完整代码示例: Github